Dive into Apache Arrow(その4)- pg2arrow で追記モード

先日、Apache Arrow 東京ミートアップ 2019というイベントに参加させていただいた。

発表時の様子(photo by 畔勝さん)

発表自体は、SSD-to-GPU Direct SQLからArrow_Fdw、4GPU+16SSDによる最近のベンチマークの紹介などで、目新しいものというよりは総集編であるが、懇親会の際にこんな質問をいただいた。

Apache Arrowファイルの追記ってどうやってるんですか?』

曰く、FluentdのApache Arrow出力用プラグインにおいて、集積したログの書き出しのタイミングとその際のI/O負荷の問題だそうな。
確かに Apache Arrow は列志向なので、一見、既に100万行分のデータを保持しているファイルに、新たに10万行のデータを追加するには、ファイル全体の再編成と書き直しが必要に見えるかもしれない。
しかし、この人の内部フォーマットをよく読んでみると、データの追記に関してはかなり低いコストで実行する事ができるように設計されており、上の例で言えば、追記処理に関しては『既に書き込んだ100万行は全く変更せず、10万行分の書き込み+α程度』のコストで実行できる。

今回は、PostgreSQLのテーブル(クエリ結果)を Apache Arrow ファイルとして保存する pg2arrow コマンドにこの追記モードを付けてみたという話を書いてみる事にする。

内部データ構造 Record Batch

今年の頭に、pg2arrowArrow_Fdwの機能を実装するために Apache Arrow のファイル形式を調査してみた。割と読みごたえのあるバイナリであるが、追記処理を実装するにあたって重要なポイントは一つ。『Arrowファイルは尻から読む
kaigai.hatenablog.com

Apache Arrowファイルの内部構造を順に追っていくと、ざっくり、先頭から以下の順に並んでいる。

  • ヘッダ("ARROW1\0\0"
  • スキーマ定義(列の名前やデータ型など)
  • ディクショナリ・バッチ(辞書圧縮用の辞書;複数)
  • レコード・バッチ(N件分のデータを列形式で記録;複数)
  • フッタ(スキーマ定義の複製と、ディクショナリ/レコードバッチの位置情報)

意外かもしれないが、例えば100万件分のデータ要素を持つApache Arrow形式ファイルであっても、内部のデータ構造は100万個のXXX型配列が並んでいる・・・とは必ずしも言い切れない。(もちろん、そういう編成にもできるが)
Apache Arrow形式ファイルの内側には、任意の件数のデータを列形式で束ねたレコード・バッチ(Record Batch)と呼ばれる領域がある。例えば1万件ごとにRecord Batchで切るとすると、Record Batchの内側にはA列の要素が1万個、B列の要素が1万個、C列の要素が1万個・・・と並んでおり、全体で100万件なら、このRecord Batchが100個順番に並んでいるという形になる。
もちろん、100万件のデータを持つRecord Batchを1個で、総計100万件のデータを含むApache Arrowファイルを構成する事もできる。この場合は、単純にA列の要素が100万個、B列の要素が100万個・・・と配置される事になる。

Arrowファイルは尻から読む

Apache Arrow形式ファイルの『どこからどこまで』がレコード・バッチなのかという情報は、ファイルの一番最後、フッタ領域に書かれている。例えば『ファイルの先頭から1200バイト、以降10MBはRecord Batch-0である』というノリである。*1

さて、このフッタ領域は、レコード・バッチの並びの直後に存在する。
例えば、レコード・バッチを100個持つApache Arrowファイルのフッタには、レコード・バッチ領域を指し示す(オフセット・サイズ)の組が100個書き込まれているわけだが、ここで100番目のレコード・バッチの直後に101番目のレコード・バッチを追加してみる事にする。
そうすると、フッタ領域は当然ながら上書きされてしまう。南無。
そしてその後ろに(オフセット・サイズ)の組を101個持つフッタを新たに書き込んでやると、ファイルの前半への書き込み操作を一切行う事なく、Apache Arrow形式ファイルへの追記操作を行えることになる。

これを、pg2arrowコマンドに実装してみた。

pg2arrowによるテーブルのダンプ(Arrow形式)

pg2arrowコマンドは、PG-Stromのユーティリティとして配布しているコマンドで、pg_dumpに似たノリでSQLの実行結果をPostgreSQLからダンプし、Apache Arrow形式ファイルとして保存するためのツールである。
使い方は以下の通り。

$ ./pg2arrow --help
Usage:
  pg2arrow [OPTION]... [DBNAME [USERNAME]]

General options:
  -d, --dbname=DBNAME     database name to connect to
  -c, --command=COMMAND   SQL command to run
  -f, --file=FILENAME     SQL command from file
      (-c and -f are exclusive, either of them must be specified)
  -o, --output=FILENAME   result file in Apache Arrow format
      --append=FILENAME   result file to be appended

      --output and --append are exclusive to use at the same time.
      If neither of them are specified, it creates a temporary file.)

Arrow format options:
  -s, --segment-size=SIZE size of record batch for each
      (default: 256MB)

Connection options:
  -h, --host=HOSTNAME     database server host
  -p, --port=PORT         database server port
  -U, --username=USERNAME database user name
  -w, --no-password       never prompt for password
  -W, --password          force password prompt

Debug options:
      --dump=FILENAME     dump information of arrow file
      --progress          shows progress of the job.

Report bugs to <pgstrom@heterodb.com>.

ある程度複雑なデータ構造の方が面白いので、列挙型(Enum)、複合型を含むテーブルを作成し、テストデータを投入してみた。

postgres=# create type label as enum ('Tokyo','Osaka','Nagoya','Yokohama','Kyoto');
CREATE TYPE
postgres=# create type comp as (x int, y real, z text);
CREATE TYPE
postgres=# create table t (id int, a float, b numeric, c comp, d label, e timestamp, f text);
CREATE TABLE

postgres=# insert into t (select x, 1000*pgstrom.random_float(2),
                                    1000*pgstrom.random_float(2),
                                    null, /* set later */
                                    (case (5*random())::int when 0 then 'Tokyo'
                                                            when 1 then 'Osaka'
                                                            when 2 then 'Nagoya'
                                                            when 3 then 'Yokohama'
                                                            when 4 then 'Kyoto'
                                                            else null end)::label,
                                    pgstrom.random_timestamp(2),
                                    md5(x::text)
                            from generate_series(1,1000) x);
INSERT 0 1000
postgres=# update t set c.x = pgstrom.random_int(2,-1000,1000),
                        c.y = 1000*pgstrom.random_float(2),
                        c.z = 'ROW#' || id::text;
UPDATE 1000

pgstrom.random_xxxx()というのはランダムなデータを時々NULLを混ぜつつ生成してくれる関数。
でき上ったテストデータはこういった感じになっている。

postgres=# select * from t order by id limit 8;
 id |        a         |        b         |          c           |    d     |             e              |                f
----+------------------+------------------+----------------------+----------+----------------------------+----------------------------------
  1 |  793.46183025905 |  718.62576097186 | (649,104.976,ROW#1)  |          | 2016-10-20 02:42:38.101797 | c4ca4238a0b923820dcc509a6f75849b
  2 | 626.670837228499 | 913.748125505516 | (-582,598.061,ROW#2) | Yokohama | 2018-06-29 06:38:45.351404 | c81e728d9d4c2f636f067f89cc14862c
  3 | 862.318314082137 | 810.705138747909 | (419,382.42,ROW#3)   | Yokohama | 2017-03-19 19:20:20.993358 | eccbc87e4b5ce2fe28308fd9f2a7baf3
  4 | 686.473733599518 |                  | (4,176.449,ROW#4)    | Osaka    | 2022-01-10 23:46:09.343218 | a87ff679a2f3e71d9181a67b7542122c
  5 | 957.214601783647 | 324.905697873284 | (180,320.756,ROW#5)  |          | 2022-08-31 14:58:22.203866 | e4da3b7fbbce2345d7772b0674a318d5
  6 | 284.569805620504 | 32.4126081692114 | (585,601.726,ROW#6)  |          | 2015-09-09 13:00:28.160389 | 1679091c5a880faf6fb5e6087eb1b2dc
  7 | 595.694404372803 | 324.796066770701 | (663,489.07,ROW#7)   | Yokohama | 2019-07-28 00:20:45.679467 | 8f14e45fceea167a5a36dedd4bea2543
  8 | 770.799666070752 | 44.1467431579469 | (603,646.233,ROW#8)  | Osaka    | 2017-07-14 05:46:05.558446 | c9f0f895fb98ab9159f51fd0297e236d
(8 rows)

ゴチャゴチャしているが、c列は数値と文字列の複合型、d列は見た目文字列だが内部的には32bit整数値のEnum型のデータである。

このテーブルをpg2arrowを使ってダンプする。1000件程度なので、レコードバッチは1個だけ。

$ ./pg2arrow -h localhost -d postgres -c "SELECT * FROM t" -o /tmp/hoge.arrow

PythonApache Arrowバインディングである PyArrow を使って中身を検算してみる事にする。

$ python3
Python 3.6.8 (default, Oct  7 2019, 17:58:22)
[GCC 8.2.1 20180905 (Red Hat 8.2.1-3)] on linux
Type "help", "copyright", "credits" or "license" for more information.
>>> import pyarrow as pa
>>> import pandas as pd
>>> f = pa.ipc.open_file('/tmp/hoge.arrow')
>>> f.schema
id: int32
a: double
b: decimal(11, 30)
c: struct<x: int32, y: float, z: string>
  child 0, x: int32
  child 1, y: float
  child 2, z: string
d: dictionary<values=string, indices=int32, ordered=0>
e: timestamp[us]
f: string

ArrowのStruct型にマップされたPostgreSQLの複合型や、Dictionary付きのString型としてマップされたPostgreSQLの列挙型も含め、スキーマ定義はきちんと反映されている事が分かる。

続いて、中身を確認してみる。レコードバッチの数は一個。

>>> f.num_record_batches
1

Pandasデータフレームに変換してみる

>>> X = f.get_record_batch(0)
>>> Y = X.to_pandas()
>>> Y
       id  ...                                 f
0       1  ...  c4ca4238a0b923820dcc509a6f75849b
1       2  ...  c81e728d9d4c2f636f067f89cc14862c
2       3  ...  eccbc87e4b5ce2fe28308fd9f2a7baf3
3       4  ...  a87ff679a2f3e71d9181a67b7542122c
4       5  ...  e4da3b7fbbce2345d7772b0674a318d5
..    ...  ...                               ...
995   996  ...  0b8aff0438617c055eb55f0ba5d226fa
996   997  ...  ec5aa0b7846082a2415f0902f0da88f2
997   998  ...  9ab0d88431732957a618d4a469a0d4c3
998   999  ...  b706835de79a2b4e80506f582af3676a
999  1000  ...  a9b7ba70783b617e9998dc4dd82eb3c5

一応、md5チェックサムの値(文字列)をぶち込んだf列はSQLで見た値と同じものが入っている。

タイムスタンプ型であるe列の内容をSQLの出力と比較してみる。

>>> Y['e']
0     2016-10-20 02:42:38.101797
1     2018-06-29 06:38:45.351404
2     2017-03-19 19:20:20.993358
3     2022-01-10 23:46:09.343218
4     2022-08-31 14:58:22.203866
                 ...
995   2016-05-12 00:03:53.986811
996   2023-12-15 02:51:58.066008
997   2020-10-29 14:27:54.705099
998   2015-10-02 13:18:13.312924
999   2020-05-06 04:06:50.749883
Name: e, Length: 1000, dtype: datetime64[ns]
postgres=# select id,e from t order by id limit 8;
 id |             e
----+----------------------------
  1 | 2016-10-20 02:42:38.101797
  2 | 2018-06-29 06:38:45.351404
  3 | 2017-03-19 19:20:20.993358
  4 | 2022-01-10 23:46:09.343218
  5 | 2022-08-31 14:58:22.203866
  6 | 2015-09-09 13:00:28.160389
  7 | 2019-07-28 00:20:45.679467
  8 | 2017-07-14 05:46:05.558446
(8 rows)

pg2arrowによる追記

では、今回の新機能 --append モードを試してみる。

同じテーブルを再度追記し、レコードバッチを2個、計2,000行のApache Arrowファイルを作成する事にするが、その前に少し錯乱要因として、列挙型に新しいラベルを追加しておく事にする。

postgres=# alter type label add value 'Kobe';
ALTER TYPE
postgres=# update t set d = 'Kobe' where d is null;
UPDATE 94

今度は、先ほど-o /tmp/hoge.arrowと指定した部分を--append /tmp/hoge.arrowと変えてみる。

$ ./pg2arrow -h localhost -d postgres -c "SELECT * FROM t" --append /tmp/hoge.arrow

PyArrowを介して中身を見てみると、スキーマ定義は前の通り(あたり前)で、レコードバッチが2個に増えている。

$ python3
Python 3.6.8 (default, Oct  7 2019, 17:58:22)
[GCC 8.2.1 20180905 (Red Hat 8.2.1-3)] on linux
Type "help", "copyright", "credits" or "license" for more information.
>>> import pyarrow as pa
>>> import pandas as pd
>>> f = pa.ipc.open_file('/tmp/hoge.arrow')
>>> f.schema
id: int32
a: double
b: decimal(11, 30)
c: struct<x: int32, y: float, z: string>
  child 0, x: int32
  child 1, y: float
  child 2, z: string
d: dictionary<values=string, indices=int32, ordered=0>
e: timestamp[us]
f: string
>>> f.num_record_batches
2

追加した方のレコードバッチを確認すると、きちんと列挙型であるd列にKobeというラベルが出現している。

>>> X = f.get_record_batch(1)
>>> Y = X.to_pandas()
>>> Y['d']
0          Kobe
1      Yokohama
2      Yokohama
3         Osaka
4          Kobe
         ...
995      Nagoya
996        Kobe
997      Nagoya
998       Kyoto
999    Yokohama
Name: d, Length: 1000, dtype: category
Categories (6, object): [Tokyo, Osaka, Nagoya, Yokohama, Kyoto, Kobe]

もちろん、元から存在する方のレコードバッチで内容が化けたりは、ない。
(PandasではNULL値はNaNと表記されるようだ)

>>> X = f.get_record_batch(0)
>>> Y = X.to_pandas()
>>> Y['d']
0           NaN
1      Yokohama
2      Yokohama
3         Osaka
4           NaN
         ...
995      Nagoya
996         NaN
997      Nagoya
998       Kyoto
999    Yokohama
Name: d, Length: 1000, dtype: category
Categories (6, object): [Tokyo, Osaka, Nagoya, Yokohama, Kyoto, Kobe]

これは何の布石なのか?

元々PG-StromにはGstore_Fdwという機能があり、GPUメモリ上に列ストアを作って、そこにデータをINSERTする事ができるようになっている。
kaigai.hatenablog.com

ただ、これはNVIDIAがRAPIDSフレームワークを発表する前に設計・開発したもので、内部のデータ形式はPG-Stromの独自。Pythonとの連携はcuPyで行うか、あるいはPL/CUDAから参照するしか手がなかった。

もう一つのFDWであるArrow_Fdwは、元々SSD-to-GPU Direct SQLを使うレベルの大量データ処理において、列データ形式を採用する事でより効率的なI/Oを目指したものだが、

  • RAPIDSフレームワーク(cuDF)でも内部データ構造にArrowを使っている
  • データの置き場所を色々選択できるようにしたら、同じコードを流用できる
  • バルクデータの追記のみ(あと無条件DELETE)に限れば、書き込みもさほど無理が無い

という事で、Arrow_Fdwを拡張してGPUバイスメモリ、あるいは容量単価の安い(とされる)Persistent Memoryなどのデータストアとして利用可能とし、Pythonスクリプトなどから容易にデータ連携を可能にするという青写真を描いている。

そうすると、TBを越えてくるような大量データは、先ずSSD-to-GPU Direct SQL + Arrow_Fdwを用いて高速な集計・前処理を実行。SQLでゴニョっと前処理したデータを、今度はGPUバイスメモリ上のArrow_FdwにINSERTすれば、Pythonスクリプト側ではCSVファイルを読んだりすることなく、DBから直接バイナリのデータをインポートできる。
データセットを少し変えてみたくなった場合でも、WHERE句を少しいじれば異なるデータセットに対して機械学習エンジンがきちんと作用するかどうかを確認する事ができ、TRY&ERRORの生産性向上にかなりのレベルで寄与できるのではないかと考えている。

いかがなものだろうか? メリー・クリスマス

*1:この他には、ファイルの先頭にも書かれているスキーマ定義のコピーもフッタ領域に書かれている。おそらく、これはファイルの末尾と先頭を読むためにディスクをシークせずに済ますための工夫であろう

CitusDB + PG-StromでScale-up+outする。

PostgreSQL Advent Calendar 2019の14日目です。

PG-Stromの開発をやってると、しばしば聞かれるのが

『マルチノードの並列処理って対応してるんですか?』

という質問。

まぁ、『対応しておりませんし、対応する予定もございません』という回答になるんですが、別にこれはウチのやる気の問題ではなく、PG-StromはPostgreSQLの拡張モジュールとして設計されているため、並列分散処理に関しては他のメカニズムに任せてしまえばよい、というだけの話である。

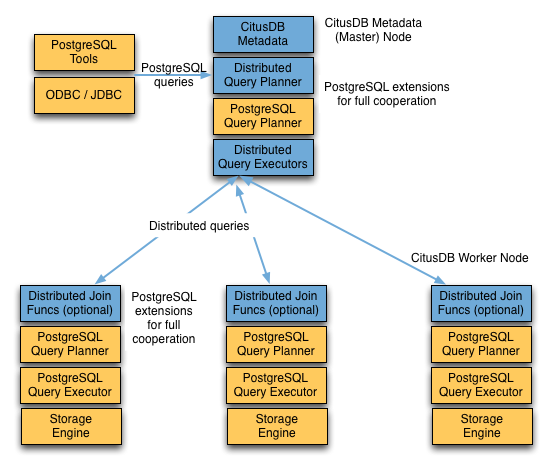
そこで、今回は同じくPostgreSQLの拡張モジュールとして実装されているスケールアウト機能の Citus と、PG-Stromを組み合わせてちゃんと動作するんですよという事を検証してみる事にする。

Citusとは?

PostgreSQLにデータ分散と並列処理機構を付加する拡張モジュールで、PostgreSQLの拡張モジュールとして実装されている。*1
この人はコーディネータ+多数のワーカーノードという構成になっており、指定したテーブルを複数のワーカーノードに分割して保存するシャーディング機能を持っている。したがって、テーブルサイズが肥大化しても、一台のワーカーノードで処理すべきデータ量を抑える事ができる。
また、巨大テーブルをスキャンする集計クエリを受け取ると、コーディネータはそれを各ワーカーノードで分割実行できるよう切り分け、ワーカーノードは自らの担当範囲だけを集計した上で、コーディネータが最終結果を生成してユーザに返すというMap-Reduceチックな並列処理を行う事ができる。

一部機能を限定はしているものの、Citusの拡張モジュールはオープンソースとして公開されており、お手軽に試すことができる。
開発元の CitusData社 は2011年創業のスタートアップで、2019年には Microsoft に買収される(パチパチ)。現在は Azure上で HyperScale というブランドで展開されている。

検証構成

CitusをPG-Stromを組み合わせて使うケースで最も素直な構成は、各ワーカーノードが GPU + NVME を持ち、そこでPG-Stromが動作するという構成である。
Citusのコーディネータがクエリを受け取った後、それを各ワーカーノードが実行可能な形に書き換えて処理をキックするが、これはワーカーノードにとっては通常のSQL処理と変わらないので、そこでGPUを用いる方が合理的であれば(つまり、オプティマイザがそう判断すれば)GPUを使用するし、NVME-SSDからのデータ読出しであればSSD-to-GPU Direct SQLを使用する事もできる。

少し機材の都合で、自宅のパソコンのPCIEカードを以下のように組み替えて、2台の独立したサーバに相当する構成を作ってみた。
この場合、NVME0~3⇒GPU0と、NVME4~7⇒GPU1へのデータ転送は全く他方に影響を与えないため、I/O負荷は完全に独立して処理されると考えてよい。

まず、これらディスク領域の準備からはじめる。

[kaigai@kujira ~]$ ls -l /dev/nvme*n1p1
brw-rw----. 1 root disk 259,  1 Dec  6 14:47 /dev/nvme0n1p1
brw-rw----. 1 root disk 259,  3 Dec  6 14:47 /dev/nvme1n1p1
brw-rw----. 1 root disk 259, 14 Dec  6 14:47 /dev/nvme2n1p1
brw-rw----. 1 root disk 259,  5 Dec  6 14:47 /dev/nvme3n1p1
brw-rw----. 1 root disk 259, 13 Dec  6 14:47 /dev/nvme4n1p1
brw-rw----. 1 root disk 259, 15 Dec  6 14:47 /dev/nvme5n1p1
brw-rw----. 1 root disk 259, 12 Dec  6 14:47 /dev/nvme6n1p1
brw-rw----. 1 root disk 259, 10 Dec  6 14:47 /dev/nvme7n1p1

ご覧のように、8台のNVME-SSDが見えており、これらを4台ずつ束ねてストライピング構成を作る。
ここで使用しているNVME-SSDIntelDC P4510 (U.2; 1.0TB)で、SeqReadのカタログスペックは 2850MB/s。つまり、4台束ねれば理論上 11.4GB/s 程度までは出る事になる。*2

以下のようにmdadmコマンドを用いて md-raid0 区画を作成する。
最後のは、/etc/mdadm.confファイルを作成して再起動時に区画が復元されるようにするための設定。

[root@kujira kaigai]# mdadm -C /dev/md0 -c 128 -l 0 -n 4 /dev/nvme0n1p1 /dev/nvme1n1p1 /dev/nvme2n1p1 /dev/nvme3n1p1
mdadm: Defaulting to version 1.2 metadata
mdadm: array /dev/md0 started.

[root@kujira kaigai]# mdadm -C /dev/md1 -c 128 -l 0 -n 4 /dev/nvme4n1p1 /dev/nvme5n1p1 /dev/nvme6n1p1 /dev/nvme7n1p1
mdadm: Defaulting to version 1.2 metadata
mdadm: array /dev/md1 started.

[root@kujira kaigai]# mdadm --detail --scan > /etc/mdadm.conf

この辺は流れ作業だが、md-raid0区画上にパーティションを切り、Ext4で初期化する。

# fdisk /dev/md0
# fdisk /dev/md1

# mkfs.ext4 -LNVME0 /dev/md0p1
# mkfs.ext4 -LNVME1 /dev/md1p1

# cat /etc/fstab
        :
    (snip)
        :
LABEL=NVME0             /nvme/0                 ext4    nofail          0 0
LABEL=NVME1             /nvme/1                 ext4    nofail          0 0

ここで設定した /nvme/0 ボリューム上にCitus+PG-Stromのワーカー1号を、/nvme/1ボリューム上にワーカー2号を配置する。

PostgreSQL (Citus + PG-Strom) の構築

まず、各ワーカーノードの構築を行う。物理的にI/Oは切り離されているとはいえ、同じマシンなので、ポート番号を微妙にずらすことにする。
ワーカー1号を 5433 ポートで、ワーカー2号を 5434 ポートで動かすことにする。

initdbでデータベースクラスタを作成する。

# mkdir /nvme/0/pgdata
# chown postgres:postgres -R /nvme/0/pgdata
# su - postgres -c 'initdb -D /nvme/0/pgdata'

次に、ワーカー側のpostgreql.confを修正する。とはいってもshared_preload_librariesなど基本的なものだけ。

port = 5433
shared_buffers = 12GB
work_mem = 10GB
max_worker_processes = 100
shared_preload_libraries = 'citus,pg_strom'

これで、ワーカー側のPostgreSQLを起動する事ができる。

# su - postgres -c 'pg_ctl start -D /nvme/0/pgdata'

ログを見ると、2台のTesla P40にそれぞれ近傍のNVME-SSDが4台ずつ認識されている事がわかる。
(見やすさのため、タイムスタンプをカット)

LOG:  number of prepared transactions has not been configured, overriding
LOG:  PG-Strom version 2.3 built for PostgreSQL 11
LOG:  PG-Strom: GPU1 Tesla P40 (3840 CUDA cores; 1531MHz, L2 3072kB), RAM 22.38GB (384bits, 3.45GHz), CC 6.1
LOG:  PG-Strom: GPU2 Tesla P40 (3840 CUDA cores; 1531MHz, L2 3072kB), RAM 22.38GB (384bits, 3.45GHz), CC 6.1
LOG:    -  PCIe[0000:17]
LOG:        -  PCIe(0000:17:00.0)
LOG:            -  PCIe(0000:18:00.0)
LOG:                -  PCIe(0000:19:08.0)
LOG:                    -  PCIe(0000:1a:00.0)
LOG:                        -  PCIe(0000:1b:00.0)
LOG:                            -  PCIe(0000:1c:00.0) nvme0 (INTEL SSDPE2KX010T8)
LOG:                        -  PCIe(0000:1b:01.0)
LOG:                            -  PCIe(0000:1d:00.0) nvme1 (INTEL SSDPE2KX010T8)
LOG:                        -  PCIe(0000:1b:02.0)
LOG:                            -  PCIe(0000:1e:00.0) nvme2 (INTEL SSDPE2KX010T8)
LOG:                        -  PCIe(0000:1b:03.0)
LOG:                            -  PCIe(0000:1f:00.0) nvme3 (INTEL SSDPE2KX010T8)
LOG:                -  PCIe(0000:19:10.0)
LOG:                    -  PCIe(0000:20:00.0) GPU1 (Tesla P40)
LOG:    -  PCIe[0000:ae]
LOG:        -  PCIe(0000:ae:00.0)
LOG:            -  PCIe(0000:af:00.0)
LOG:                -  PCIe(0000:b0:08.0)
LOG:                    -  PCIe(0000:b1:00.0) GPU2 (Tesla P40)
LOG:                -  PCIe(0000:b0:10.0)
LOG:                    -  PCIe(0000:b2:00.0)
LOG:                        -  PCIe(0000:b3:00.0)
LOG:                            -  PCIe(0000:b4:00.0) nvme4 (INTEL SSDPE2KX010T8)
LOG:                        -  PCIe(0000:b3:01.0)
LOG:                            -  PCIe(0000:b5:00.0) nvme5 (INTEL SSDPE2KX010T8)
LOG:                        -  PCIe(0000:b3:02.0)
LOG:                            -  PCIe(0000:b6:00.0) nvme6 (INTEL SSDPE2KX010T8)
LOG:                        -  PCIe(0000:b3:03.0)
LOG:                            -  PCIe(0000:b7:00.0) nvme7 (INTEL SSDPE2KX010T8)
LOG:  GPU<->SSD Distance Matrix
LOG:             GPU0     GPU1
LOG:      nvme1  (   5)     -1
LOG:      nvme0  (   5)     -1
LOG:      nvme7     -1   (   5)
LOG:      nvme4     -1   (   5)
LOG:      nvme5     -1   (   5)
LOG:      nvme3  (   5)     -1
LOG:      nvme6     -1   (   5)
LOG:      nvme2  (   5)     -1
LOG:  HeteroDB License: { "version" : 2, "serial_nr" : "HDB-TRIAL", "issued_at" : "6-Dec-2019", "expired_at" : "1-Jan-2030", "gpus" : [ { "uuid" : "GPU-b44c118b-1058-16cb-1cbb-5dbe0fe6181a", "pci_id" : "0000:20:00.0" } , { "uuid" : "GPU-a137b1df-53c9-197f-2801-f2dccaf9d42f", "pci_id" : "0000:b1:00.0" } ] }
LOG:  listening on IPv6 address "::1", port 5434
LOG:  listening on IPv4 address "127.0.0.1", port 5434
LOG:  listening on Unix socket "/var/run/postgresql/.s.PGSQL.5434"
LOG:  listening on Unix socket "/tmp/.s.PGSQL.5434"
LOG:  redirecting log output to logging collector process
HINT:  Future log output will appear in directory "log".

この様に、それぞれ/nvme/0/nvme/1上にワーカーのPostgreSQLインスタンスを起動した。
最後に、これらワーカー側に直接接続してCREATE EXTENSIONを実行する。

$ psql -U postgres -p 5433
psql (11.5)
Type "help" for help.

postgres=# create extension pg_strom;
CREATE EXTENSION
postgres=# create extension citus;
CREATE EXTENSION

次にコーディネータの構築であるが、この人は自分でデータを持つわけでもなく、大量のスキャンを行うわけでもないので、どこか適当な磁気ディスク上の区画でも割り当てておけばよい。
デフォルトの/var/lib/pgdataにDBを構築し、Citusモジュールだけをロードするように構成した。

以上でコーディネータ、ワーカーの初期設定は完了である。

テーブルの作成とデータの投入

テスト用に、いつもの SSBM (Star Schema Benchmark) のテーブルを構築し、このうち最もサイズの大きなlineorderテーブルを各ワーカーに分散配置する事にする。
scale factorは401で、DBサイズにすると 353GB 程度。数字に深い意味はないが、これまでこのサイズで性能計測をしていた事が多かったので。

まず、通常通りCREATE TABLE文を投入する。例えばlineorderテーブルであれば以下のような、いたって何の変哲もないCREATE TABLEである。

CREATE TABLE lineorder (
    lo_orderkey numeric,
    lo_linenumber integer,
    lo_custkey numeric,
    lo_partkey integer,
    lo_suppkey numeric,
    lo_orderdate integer,
    lo_orderpriority character(15),
    lo_shippriority character(1),
    lo_quantity numeric,
    lo_extendedprice numeric,
    lo_ordertotalprice numeric,
    lo_discount numeric,
    lo_revenue numeric,
    lo_supplycost numeric,
    lo_tax numeric,
    lo_commit_date character(8),
    lo_shipmode character(10)
);

少し Citus のオリジナル要素はこの次。lineorderを分散配置する場合は、create_distributed_table関数を用いて、システムに分散配置すべきテーブルと分散キーに用いるカラムを教えてやる。

postgres=# SELECT create_distributed_table('lineorder', 'lo_orderkey');
 create_distributed_table
--------------------------

(1 row)

テーブルを分散配置せず、各ワーカーに複製をコピーするというやり方もある。この場合はcreate_reference_table関数を使用する。

postgres=# SELECT create_reference_table('date1');
 create_reference_table
------------------------

(1 row)

このように設定する事でdistributed tableとreference tableのJOINをワーカー側で実行する事が可能となり、コーディネータの負荷を最大限に下げる事ができる。

そして、最後にコーディネータ側からデータを投入する。

postgres=# \copy lineorder from program './dbgen-ssbm -X -Tl -s 401' delimiter '|'
SSBM (Star Schema Benchmark) Population Generator (Version 1.0.0)
Copyright Transaction Processing Performance Council 1994 - 2000
COPY 2406009932

コーディネータ側から見ても実際のデータサイズは分からないが、、、

postgres=# \d+
                        List of relations
 Schema |   Name    | Type  |  Owner   |    Size    | Description
--------+-----------+-------+----------+------------+-------------
 public | customer  | table | postgres | 8192 bytes |
 public | date1     | table | postgres | 8192 bytes |
 public | lineorder | table | postgres | 8192 bytes |
 public | part      | table | postgres | 8192 bytes |
 public | supplier  | table | postgres | 8192 bytes |
(5 rows)

ワーカー側に接続してみると、確かに分散テーブルが細切れになって保存されている様子が分かる。
(そして reference table は単純にコピーされている)

[kaigai@kujira ~]$ psql -U postgres postgres -p 5433
psql (11.5)
Type "help" for help.

postgres=# \d+
                          List of relations
 Schema |       Name       | Type  |  Owner   |  Size   | Description
--------+------------------+-------+----------+---------+-------------
 public | customer_102072  | table | postgres | 1627 MB |
 public | date1_102075     | table | postgres | 416 kB  |
 public | lineorder_102040 | table | postgres | 11 GB   |
 public | lineorder_102042 | table | postgres | 11 GB   |
 public | lineorder_102044 | table | postgres | 11 GB   |
 public | lineorder_102046 | table | postgres | 11 GB   |
 public | lineorder_102048 | table | postgres | 11 GB   |
 public | lineorder_102050 | table | postgres | 11 GB   |
 public | lineorder_102052 | table | postgres | 11 GB   |
 public | lineorder_102054 | table | postgres | 11 GB   |
 public | lineorder_102056 | table | postgres | 11 GB   |
 public | lineorder_102058 | table | postgres | 11 GB   |
 public | lineorder_102060 | table | postgres | 11 GB   |
 public | lineorder_102062 | table | postgres | 11 GB   |
 public | lineorder_102064 | table | postgres | 11 GB   |
 public | lineorder_102066 | table | postgres | 11 GB   |
 public | lineorder_102068 | table | postgres | 11 GB   |
 public | lineorder_102070 | table | postgres | 11 GB   |
 public | part_102073      | table | postgres | 206 MB  |
 public | supplier_102074  | table | postgres | 528 MB  |
(20 rows)

vacuum analyzeを走らせる

最後に、SSD-to-GPU Direct SQLに必要な visibility map を強制的に作成するために、vacuum analyzeを実行する。まさかコーディネータ側の空っぽテーブルをvacuumするだけじゃないよね?と思ったが、さすがに杞憂だったというか、ワーカー側できちんと分散処理してくれていた。

postgres=# vacuum analyze lineorder ;

を、実行中のtopコマンドの出力

top - 16:14:08 up  4:03,  5 users,  load average: 5.79, 1.35, 1.04
Tasks: 418 total,  24 running, 394 sleeping,   0 stopped,   0 zombie
%Cpu(s): 15.2 us, 33.0 sy,  0.0 ni,  7.9 id, 43.8 wa,  0.0 hi,  0.0 si,  0.0 st
KiB Mem : 19651427+total,   525488 free,  5696528 used, 19029225+buff/cache
KiB Swap:  8388604 total,  8380412 free,     8192 used. 18758867+avail Mem

   PID USER      PR  NI    VIRT    RES    SHR S  %CPU %MEM     TIME+ COMMAND
   150 root      20   0       0      0      0 R  59.3  0.0   0:52.53 kswapd0
 17275 postgres  20   0   12.9g  48344  44076 D  56.3  0.0   0:05.91 postgres
   151 root      20   0       0      0      0 R  53.7  0.0   0:27.33 kswapd1
   321 root      20   0       0      0      0 S  51.0  0.0   0:33.39 kworker/u274:5
 17311 root      20   0       0      0      0 S  48.7  0.0   0:01.91 kworker/u274:0
 17286 postgres  20   0   12.9g  48016  43760 D  44.7  0.0   0:04.55 postgres
 17295 postgres  20   0   12.9g  47956  43704 R  42.3  0.0   0:04.33 postgres
 17298 postgres  20   0   12.9g  47932  43680 R  42.0  0.0   0:04.65 postgres
  6657 postgres  20   0   12.9g 339180 324212 R  41.3  0.2   6:54.01 postgres
 17281 postgres  20   0   12.9g  48340  44076 R  41.3  0.0   0:05.74 postgres
 17301 postgres  20   0   12.9g  48180  43928 R  41.3  0.0   0:05.26 postgres
 17278 postgres  20   0   12.9g  47804  43540 R  40.7  0.0   0:04.32 postgres
 17277 postgres  20   0   12.9g  48180  43916 R  40.3  0.0   0:05.22 postgres
 17287 postgres  20   0   12.9g  47928  43660 R  38.7  0.0   0:04.15 postgres
 17279 postgres  20   0   12.9g  48000  43732 R  38.3  0.0   0:04.10 postgres
 17284 postgres  20   0   12.9g  48056  43796 R  36.3  0.0   0:04.96 postgres
 17280 postgres  20   0   12.9g  48196  43928 R  34.0  0.0   0:04.84 postgres
  6658 postgres  20   0   12.9g 330544 322924 D  31.3  0.2   6:29.77 postgres
 17292 postgres  20   0   12.9g  47804  43552 R  31.3  0.0   0:04.45 postgres
 17294 postgres  20   0   12.9g  48068  43812 D  27.7  0.0   0:04.30 postgres
 17283 postgres  20   0   12.9g  47832  43560 R  26.0  0.0   0:04.14 postgres
 17289 postgres  20   0   12.9g  48060  43800 R  25.7  0.0   0:05.18 postgres
 17291 postgres  20   0   12.9g  47804  43552 R  25.7  0.0   0:04.01 postgres
 17302 postgres  20   0   12.9g  47940  43688 R  24.0  0.0   0:05.04 postgres
 17299 postgres  20   0   12.9g  48000  43744 R  21.7  0.0   0:04.01 postgres
 17304 postgres  20   0   12.9g  47792  43540 R  21.3  0.0   0:04.53 postgres
 17282 postgres  20   0   12.9g  47828  43564 R  19.3  0.0   0:03.52 postgres
 17290 postgres  20   0   12.9g  48080  43816 R  17.3  0.0   0:04.83 postgres
 17285 postgres  20   0   12.9g  47956  43688 D  15.0  0.0   0:04.18 postgres
 17288 postgres  20   0   12.9g  47980  43724 D  15.0  0.0   0:04.75 postgres
 17303 postgres  20   0   12.9g  48084  43828 D  14.0  0.0   0:04.89 postgres
 17276 postgres  20   0   12.9g  47968  43692 D  13.0  0.0   0:04.28 postgres
 17300 postgres  20   0   12.9g  47800  43548 R  12.3  0.0   0:03.76 postgres

集計クエリを実行してみる(Take.1)

早速、Star Schema Benchmarkの集計クエリを実行してみる事にする。
先ずは実行計画。

postgres=# explain
select sum(lo_extendedprice*lo_discount) as revenue
from lineorder,date1
where lo_orderdate = d_datekey
and d_year = 1993
and lo_discount between 1 and 3
and lo_quantity < 25;
                                                                          QUERY PLAN
--------------------------------------------------------------------------------------------------------------------------------------------------------------
 Aggregate  (cost=0.00..0.00 rows=0 width=0)
   ->  Custom Scan (Citus Adaptive)  (cost=0.00..0.00 rows=0 width=0)
         Task Count: 32
         Tasks Shown: One of 32
         ->  Task
               Node: host=localhost port=5433 dbname=postgres
               ->  Aggregate  (cost=958010.91..958010.92 rows=1 width=32)
                     ->  Gather  (cost=957962.46..958006.83 rows=408 width=8)
                           Workers Planned: 2
                           ->  Parallel Custom Scan (GpuPreAgg)  (cost=956962.46..956966.03 rows=204 width=8)
                                 Reduction: NoGroup
                                 Combined GpuJoin: enabled
                                 GPU Preference: GPU1 (Tesla P40)
                                 ->  Parallel Custom Scan (GpuJoin) on lineorder_102040 lineorder  (cost=30257.08..962321.28 rows=590200 width=10)
                                       Outer Scan: lineorder_102040 lineorder  (cost=30259.93..963572.01 rows=4133020 width=14)
                                       Outer Scan Filter: ((lo_discount >= '1'::numeric) AND (lo_discount <= '3'::numeric) AND (lo_quantity < '25'::numeric))
                                       Depth 1: GpuHashJoin  (hash-size: 66.06KB, nrows 4133020...1416481)
                                                HashKeys: lineorder.lo_orderdate
                                                JoinQuals: (lineorder.lo_orderdate = date1.d_datekey)
                                       GPU Preference: GPU1 (Tesla P40)
                                       ->  Seq Scan on date1_102075 date1  (cost=0.00..78.95 rows=365 width=4)
                                             Filter: (d_year = 1993)
(22 rows)

これを見ると、確かに Citus の独自プランであるCustom Scan (Citus Adaptive)と、PG-Stromの独自プランであるCustom Scan (GpuPreAgg)Custom Scan (GpuJoin)が混在している。

ではさっそく実行してみると、、、、Out of managed memoryエラーで止まってしまった。要はGPUリソースの食いすぎである。

GPUを使用するプログラムは、GPUバイス上に「CUDAコンテキスト」と呼ばれる実行時情報を保持する必要がある。これが最低でも150MB程度の大きさがあり、さらに、PG-Stromで処理すべきデータを保持すると、プロセスあたり平均して600MB~800MB程度のメモリを消費する事になる。
今回は、Citusがlineorderテーブルを32個のセグメントに分割し、ワーカーノード1個あたり16個のセグメントを持っている事になる。加えて、ワーカーノードで実行される集計クエリはPostgreSQLのパラレルクエリ機能により、3並列で実行((Workers Planned: 2と表示されているため、自分自身+バックグラウンドワーカー×2))されるため、GPUあたり48プロセスが全力で回るという事になる。
さすがにこれは辛みがあるので、そもそも16セグメントに分割されている分、ワーカー側の並列実行を止める事にする。

また、この実行計画には NVMe-Strom: enabledというメッセージが表示されておらず、せっかくのNVME-SSDなのに、SSD-to-GPU Direct SQLモードを利用できない。
これは、lineorderが細かく分割された結果、テーブル1個あたりのサイズが、SSD-to-GPU Direct SQLを使用する閾値よりも小さな値になっているからである。

そこで、上記2つの問題を解決するため、ワーカー側で以下の設定を追加した。

max_parallel_workers_per_gather = 0
pg_strom.nvme_strom_threshold = 1GB

集計クエリを実行してみる(Take.2)

さて、再度集計クエリを実行してみる事にする。

まずは実行計画を確認。

postgres=# explain
select sum(lo_extendedprice*lo_discount) as revenue
from lineorder,date1
where lo_orderdate = d_datekey
and d_year = 1993
and lo_discount between 1 and 3
and lo_quantity < 25;
                                                                       QUERY PLAN
--------------------------------------------------------------------------------------------------------------------------------------------------------
 Aggregate  (cost=0.00..0.00 rows=0 width=0)
   ->  Custom Scan (Citus Adaptive)  (cost=0.00..0.00 rows=0 width=0)
         Task Count: 32
         Tasks Shown: One of 32
         ->  Task
               Node: host=localhost port=5433 dbname=postgres
               ->  Aggregate  (cost=1007098.32..1007098.33 rows=1 width=32)
                     ->  Custom Scan (GpuPreAgg)  (cost=1007092.71..1007096.28 rows=204 width=8)
                           Reduction: NoGroup
                           Combined GpuJoin: enabled
                           GPU Preference: GPU1 (Tesla P40)
                           ->  Custom Scan (GpuJoin) on lineorder_102040 lineorder  (cost=9114.62..1019939.70 rows=1416481 width=10)
                                 Outer Scan: lineorder_102040 lineorder  (cost=9426.71..1098945.56 rows=9919249 width=14)
                                 Outer Scan Filter: ((lo_discount >= '1'::numeric) AND (lo_discount <= '3'::numeric) AND (lo_quantity < '25'::numeric))
                                 Depth 1: GpuHashJoin  (hash-size: 66.06KB, nrows 9919249...1416481)
                                          HashKeys: lineorder.lo_orderdate
                                          JoinQuals: (lineorder.lo_orderdate = date1.d_datekey)
                                 GPU Preference: GPU1 (Tesla P40)
                                 NVMe-Strom: enabled
                                 ->  Seq Scan on date1_102075 date1  (cost=0.00..78.95 rows=365 width=4)
                                       Filter: (d_year = 1993)
(21 rows)

ワーカー側でのパラレルクエリが消えており、また、今度はNVMe-Strom: enabledの表示が出た。

今度はEXPLAIN ANALYZEで実際にクエリを実行してみる。
実行時間は24.67sで、合計 353GB のテーブルをスキャンした結果としては中々のものである。

postgres=# explain analyze
select sum(lo_extendedprice*lo_discount) as revenue
from lineorder,date1
where lo_orderdate = d_datekey
and d_year = 1993
and lo_discount between 1 and 3
and lo_quantity < 25;
                                                                                  QUERY PLAN
-------------------------------------------------------------------------------------------------------------------------------------------------------------------------------
 Aggregate  (cost=0.00..0.00 rows=0 width=0) (actual time=24666.217..24666.218 rows=1 loops=1)
   ->  Custom Scan (Citus Adaptive)  (cost=0.00..0.00 rows=0 width=0) (actual time=24666.174..24666.181 rows=32 loops=1)
         Task Count: 32
         Tasks Shown: One of 32
         ->  Task
               Node: host=localhost port=5433 dbname=postgres
               ->  Aggregate  (cost=1007098.32..1007098.33 rows=1 width=32) (actual time=3569.988..3569.989 rows=1 loops=1)
                     ->  Custom Scan (GpuPreAgg)  (cost=1007092.71..1007096.28 rows=204 width=8) (actual time=3569.953..3569.960 rows=1 loops=1)
                           Reduction: NoGroup
                           Combined GpuJoin: enabled
                           GPU Preference: GPU1 (Tesla P40)
                           ->  Custom Scan (GpuJoin) on lineorder_102040 lineorder  (cost=9114.62..1019939.70 rows=1416481 width=10) (never executed)
                                 Outer Scan: lineorder_102040 lineorder  (cost=9426.71..1098945.56 rows=9919249 width=14) (actual time=261.049..628.315 rows=75214815 loops=1)
                                 Outer Scan Filter: ((lo_discount >= '1'::numeric) AND (lo_discount <= '3'::numeric) AND (lo_quantity < '25'::numeric))
                                 Rows Removed by Outer Scan Filter: 65374058
                                 Depth 1: GpuHashJoin  (hash-size: 66.06KB actual-size: 23.29KB, plan nrows: 9919249...1416481, actual nrows: 9840757...1490844)
                                          HashKeys: lineorder.lo_orderdate
                                          JoinQuals: (lineorder.lo_orderdate = date1.d_datekey)
                                 GPU Preference: GPU1 (Tesla P40)
                                 NVMe-Strom: load=1437612
                                 ->  Seq Scan on date1_102075 date1  (cost=0.00..78.95 rows=365 width=4) (actual time=0.075..0.348 rows=365 loops=1)
                                       Filter: (d_year = 1993)
                                       Rows Removed by Filter: 2191
                   Planning Time: 0.485 ms
                   Execution Time: 3759.495 ms
 Planning Time: 2.875 ms
 Execution Time: 24666.270 ms
(27 rows)

以下は、集計クエリ実行中の iostat の出力。これはいつも通り、I/Oの帯域をほぼ限界まで使い切っている事が分かる。

Device:            tps    MB_read/s    MB_wrtn/s    MB_read    MB_wrtn
nvme0n1       21134.00      2641.50         0.01       5283          0
nvme1n1       21214.00      2641.22         0.00       5282          0
nvme2n1       21128.50      2640.96         0.00       5281          0
nvme6n1       20678.00      2584.75         0.00       5169          0
nvme5n1       20761.50      2584.89         0.01       5169          0
nvme4n1       20683.00      2585.31         0.00       5170          0
nvme7n1       20753.00      2585.35         0.00       5170          0
nvme3n1       21194.50      2639.98         0.00       5279          0
md0           84611.50     10556.17         0.01      21112          0
md1           82911.00     10344.69         0.01      20689          0

結論

PostgreSQL向けスケールアウト拡張であるCitusと、スケールアップ拡張であるPG-Stromを組み合わせて実行できることを確認した。
こういった形で、PostgreSQL向けに設計された周辺ソフトウェアと必要に応じて組み合わせる事ができるのが、他のGPU-DBにはないPG-Stromの強みであろう。

ただし、分散テーブルの分割度合いと、PG-Stromの得意とするデータサイズを見極めて、セグメント数や並列ワーカー数を設定する必要がある。
現実問題として、PG-Stromがシングルノードで処理し切れないレベルの大規模DBという事になると、それなりの体制を組んで事前検証を行うはずなので問題にはならないハズだが。CitusはCitusで、PG-StromはPG-Stromで、それぞれ単独で使ったケースを想定してのデフォルト値設定なので、これは致し方ないところ。

*1:PG-Stromと同じくCustomScan APIを利用している

*2:実際にはこのPCIeホストカードでは10.5GB/s程度が上限っぽいが…。ただし、別の製品では11.5GB/sを記録した事はある。

CUDA10.2 の Virtual Memory Management 機能を試してみる

11月21日にリリースされた CUDA 10.2 の Release Note を読んでみると、さらっと『Added support for CUDA Virtual Memory Management APIs.』という一文が。

以前から、ManagedなGPUバイスメモリをマルチプロセスで共有できるようにしてほしいと、機能リクエストを上げていた事もあり、これがそれに該当するのかね?と、少し手を動かして試してみた。

忙しい人のために、先に結論だけ書くと、現状のCUDA Toolkit 10.2の対応範囲では、既存のcuIpcGetMemHandle()cuIpcOpenMemHandle()で実現できる機能に差はないものの、APIの仕様・拡張可能性としては、将来的にManaged Device Memoryをマルチプロセスで共有するための布石であるようにも見えるので、引き続き注視していきたい。

なお、試行錯誤の跡(サンプルプログラム)はこちら。
https://github.com/heterodb/toybox/tree/master/gpu_mmap

背景 - なぜManaged Device Memoryをマルチプロセスで共有したいか

JOIN処理をGpuJoinで実行する場合、基本的には (N-1) 個の比較的小さな(GB単位の)テーブルと、1個の巨大なテーブル(数十GB以上~)との結合というのが基本線になる。これはマスタ表とファクト表の結合というのを念頭に置いた設計であるが、説明の簡単のため、左の小さいテーブル群をInner側、右の大きなテーブルをOuter側と呼ぶ。

GpuJoinが内部的に使っている Hash Join のアルゴリズム上、Outer側を読み出しながら少しずつ処理を進めていく事はできるのだが、少なくとも Inner 側はオンメモリに、しかもGPUを使用するのでデバイスメモリに載せておく必要がある。*1

そうすると、Inner側でオンメモリにできるデータサイズは自ずとGPUの搭載メモリ容量に規定されてしまうという事がまず前提としてある。難しいのは、ここでInner側のバッファに載せる必要があるのは、Inner側テーブルを条件句付きでスキャンした結果であるので、実行計画では1,000行だと思っていたのに、実際にデータを読んでみたら百万行ありましたという可能性もある事。つまり、必ずしもオプティマイザで弾ける訳ではない。

で、もう一つ考慮すべき事項として、PostgreSQL v9.6で並列クエリがサポートされた事。
これにより、通常のバックエンドプロセスに加えて、ワーカープロセスが、並列に全く同一のGpuJoinを実行する可能性を考慮する必要が出てきたが、これを CUDA から見ると、互いに独立な複数のプロセスがGPUメモリを奪い合いながらGPU kernelを動かしているように見える。

はっきり言えば、デバイスメモリ制限の厳しい GpuJoin ワークロードにとっては最悪である。並列で動作する各プロセス毎にデバイスメモリを確保に走れば、あっという間にデバイスメモリが枯渇してしまわないとも限らない。
そこで現在のPG-Stromでは、Inner側バッファの内容を一個だけ作り、それをcuIpcGetMemHandle()cuIpcOpenMemHandle()を使って各ワーカープロセスと共有する。Inner側バッファの内容は一度作ってしまえばRead-Onlyなので、デバイスメモリの消費量はほぼ変わらない。

ただし、これらIPC系の機能を使えるのはcuMemAllocで獲得したメモリ、即ち、cuMemAlloc呼び出しの時点で実際にGPUバイスメモリの物理ページが割り当てられ、決してPage-outしない代わりにOver-subscriptionも不可という制限がある。
どういう事かというと、デバイスメモリの Over-subscription が不能であるために『あと数十MBあればInner側バッファをデバイスメモリに載せられたのに』という状況で涙を飲むしかなくなる。

一方、これが Managed Device Memory と呼ばれる領域であれば、アロケーション時点では仮想アドレス空間だけを確保しておき、プログラムが実際にその領域をアクセスした時点でページを割り当て、必要があればホストメモリ上のバッファとスワップする事で処理を継続する事もできる。

kaigai.hatenablog.com

が、その場合、前述のIPC系機能は対応していないため、マルチプロセス下でGpuJoinのInner側バッファとして利用する場合には、同じデータを重複して何ヶ所にも持つ事が必要となり無駄が多い。あっちを立てれば、こっちが立たず。

全体的な流れ

CUDA Driver APIVirtual Memory Managementの章を読んでみると、全体的な流れは以下のような形である事がわかる。

まず、デバイスメモリをエクスポートする側の流れ:

  1. cuMemCreate()を用いて、memory allocation handleを作成する。この人が物理的に割り当てられたメモリ領域の実体になる。
    • OSで言えば、shm_open(3)fallocate(2)みたいな感じ
  2. cuMemExportToShareableHandle()を用いて、memory allocation handleを指し示すユニークな識別子であるshareable-handleに変換する。
    • shareable-handleはOS種類によって実体が異なっていて、Linuxであればfile-descriptorが、WindowsであればHANDLEだと記載がある。
    • OSで言えば、shm_open(3)した時のパス名を取り出すようなAPIとでも言うべきか。

次に、デバイスメモリをインポートする側の流れ

  1. cuMemImportFromShareableHandle()を使って、上記のshareable-handleを、ローカルなmemory allocation handleに変換する。
    • OSで言えば、他のプロセスから渡された共有メモリのパス名を使ってopen(2)するようなもの。
  2. cuMemAddressReserve()を使って、このデバイスメモリをマッピングする仮想アドレス領域を予めリザーブしておく。
  3. cuMemMap()を使って、手順(1)で取得した memory allocation handle を、手順(2)で確保したアドレス空間にマップする。
  4. cuMemSetAccess()を使って、上記アドレス空間のアクセス許可を変更する。Read-onlyとRead-Writableの2種類が設定可
    • OSで言えば、上記の3ステップはmmap(2)が一度に実行する事になる。

なお、cuMemCreate()を使ってデバイスメモリを作成したプロセス自身がそれをマップして使いたい場合は、cuMemExportToShareableHandle()cuMemImportFromShareableHandle()を使うまでもなく、ローカルのmemory allocation handleを持っているので、単純にcuMemAddressReserve()cuMemMap()cuMemSetAccess()を呼び出せばよい。

注目すべきAPI:cuMemCreate()

gpu_mmap.c:L304で呼び出しているcuMemCreateの定義は以下のようになっている。

CUresult cuMemCreate ( CUmemGenericAllocationHandle* handle, size_t size, const CUmemAllocationProp* prop, unsigned long long flags);

第一引数は処理結果の memory allocation handle を返すポインタで、第二引数はサイズ。第三引数に、どういったメモリが欲しいのかという属性をセットする。

CUmemAllocationProp構造体の定義は以下のようになっており、Linuxで関係するのは最初の3つだけ。

typedef struct CUmemAllocationProp_st {
    /** Allocation type */
    CUmemAllocationType type;
    /** requested ::CUmemAllocationHandleType */
    CUmemAllocationHandleType requestedHandleTypes;
    /** Location of allocation */
    CUmemLocation location;
    /**
     * Windows-specific LPSECURITYATTRIBUTES required when
     * ::CU_MEM_HANDLE_TYPE_WIN32 is specified.  This security attribute defines
     * the scope of which exported allocations may be tranferred to other
     * processes.  In all other cases, this field is required to be zero.
     */
    void *win32HandleMetaData;
    /** Reserved for future use, must be zero */
    unsigned long long reserved;
} CUmemAllocationProp;

で、CUmemAllocationTypeを定義を確認してみると、CUDA 10.2時点で有効なのはCU_MEM_ALLOCATION_TYPE_PINNEDのみ。コメントを読むと、要はcuMemAllocと同じようにふるまうという事である。*2

typedef enum CUmemAllocationType_enum {
    CU_MEM_ALLOCATION_TYPE_INVALID = 0x0,

    /** This allocation type is 'pinned', i.e. cannot migrate from its current
      * location while the application is actively using it
      */
    CU_MEM_ALLOCATION_TYPE_PINNED  = 0x1,
    CU_MEM_ALLOCATION_TYPE_MAX     = 0xFFFFFFFF
} CUmemAllocationType;

次にCUmemAllocationHandleTypeを確認すると、これは、OS上で交換可能な shareable-handle をどのように表現するかという話で、LinuxであればCU_MEM_HANDLE_TYPE_POSIX_FILE_DESCRIPTORを選択し、識別子はintの幅を持つとされる。

typedef enum CUmemAllocationHandleType_enum {
    /**< Allows a file descriptor to be used for exporting. Permitted only on POSIX systems. (int) */
    CU_MEM_HANDLE_TYPE_POSIX_FILE_DESCRIPTOR = 0x1,
    /**< Allows a Win32 NT handle to be used for exporting. (HANDLE) */
    CU_MEM_HANDLE_TYPE_WIN32                 = 0x2,
    /**< Allows a Win32 KMT handle to be used for exporting. (D3DKMT_HANDLE) */
    CU_MEM_HANDLE_TYPE_WIN32_KMT             = 0x4,
    CU_MEM_HANDLE_TYPE_MAX                   = 0xFFFFFFFF
} CUmemAllocationHandleType;

三番目のCUmemLocationの定義は以下の通り。要はCU_MEM_LOCATION_TYPE_DEVICEを指定して、何番目のGPUでメモリを確保しますかという事になり、現状ではデバイスメモリ以外の選択肢はない。

typedef enum CUmemLocationType_enum {
    CU_MEM_LOCATION_TYPE_INVALID = 0x0,
    /**< Location is a device location, thus id is a device ordinal */
    CU_MEM_LOCATION_TYPE_DEVICE  = 0x1,
    CU_MEM_LOCATION_TYPE_MAX     = 0xFFFFFFFF
} CUmemLocationType;

typedef struct CUmemLocation_st {
    /**< Specifies the location type, which modifies the meaning of id. */
    CUmemLocationType type;
    /**< identifier for a given this location's ::CUmemLocationType. */
    int id;
} CUmemLocation;

今回、新たに追加されたAPIではあるが、こうして見てみるとCUmemAllocationPropのフラグを変えるだけで、将来的にはManaged Device Memoryのエクスポートとマルチプロセスでの共有も可能にできるようなAPIの切り方をしている。

それを強く感じるのが、次のcuMemAddressReserveである。

注目すべきAPI:cuMemAddressReserve()

CUDAのManaged Memoryのもう一つ大きな特徴として、Over-subscriptionが可能である以外にも、Host側とDevice側で同一の仮想アドレスを利用して、Page Faultをうまくハンドリングする事で、物理ページがHost側なのかDevice側なのか意識せずに(裏でデータ転送が動いている)プログラムを書けるという事があった。

しかし、これをマルチプロセスに拡張するとなると、あるプロセスAでcuMemAllocManagedを呼び出して確保したメモリの仮想アドレスが、他のプロセスBでは既に別の用途に利用されており、そうすると「Host側とDevice側で同一の仮想アドレス」という前提が損なわれるという問題があった。

おそらく、cuMemMapに先立って、わざわざ仮想アドレス空間を予約するAPIを呼び出させるという事は、『Managed Device Memoryをマルチプロセスで共有できるようになっても、当該メモリを共有する全てのプロセスで同じ仮想アドレスに揃うよう保証する事はできないので、アプリケーション側で予め仮想アドレス空間を予約して他が使えないように抑えておいてくれ』というNVIDIAからのメッセージではないだろうか?

OS上の共有メモリでも、別プロセスに貼り付けた時に同一の仮想アドレスを取れるようPROT_NONEmmapしておくというのはちょくちょく使うテクニックなので、まぁ、そういう事なんだろうと思う。*3
kaigai.hatenablog.com

注目すべきAPI:cuMemImportFromShareableHandle()

コレは注目すべきというか、注意すべきAPI

Linuxの場合、shareable-handleとして使われるのは file descriptor と確かに書いてあったが、当初、cuMemExportToShareableHandleで返ってきた値を、そのまま別プロセスでcuMemImportFromShareableHandleに渡せばよいと思って2~3時間ハマった(汗

これは当然と言えば当然だが、エクスポート元のプロセスにとっての file-descriptor = XX は、エクスポート先のプロセスにとっての file-descriptor = XX ではないので、UNIXドメインソケットとsendmsg(2)/recvmsg(2)にSCM_RIGHTSを使って、file-descriptorの複製を作ってやる必要がある。

gpu_mmap.c:L98以降の一連の処理は、その辺のファイルディスクリプタの受け渡しに関するもの。
折角なので、バッファのサイズとGPUのデバイスIDをメッセージに載せて渡すようにしている。

注目すべきAPI:cuMemSetAccess()

cuMemMapでデバイスメモリをマップするだけでは、この領域に対するアクセス権が無いのでCUDA_ERROR_ILLEGAL_ADDRESSエラーになってしまう。
なので、CU_MEM_ACCESS_FLAGS_PROT_READCU_MEM_ACCESS_FLAGS_PROT_READWRITEを指定する必要がある。

当初、Over-subscriptionが使えないなら、せめてInner側バッファをread-writableで作成し、その後read-onlyに変えるようにしたら、不慮の事故でメモリ破壊を防げる的な利点はあるかと思ったが…。

↓インポート側プロセスでCU_MEM_ACCESS_FLAGS_PROT_READを指定した場合。

[kaigai@magro gpu_mmap]$ ./gpu_mmap
total sum [master]: 6420001848.309442
gpu_mmap.c:259  failed on cuMemSetAccess: CUDA_ERROR_INVALID_VALUE

CU_MEM_ACCESS_FLAGS_PROT_READWRITEを指定しないと怒られました。Orz...

結論

サンプルプログラムは、エクスポート側プロセスでデバイスメモリを確保し、それを(なんちゃって)ランダムな値で埋めたあと、インポート側プロセスでそれをマップし、それぞれ合計値を計算するだけのGPUカーネルを実行するというもの。

このように、明示的なデータのコピーは無いものの、同じメモリ領域に対して同じ集計演算を実行した結果、同じ結果を出力している。(浮動小数点同士の加算なので、集計のタイミングによって多少の誤差が出るのは仕方ない)

[kaigai@magro gpu_mmap]$ ./gpu_mmap
total sum [master]: 6420001848.309442
total sum [17767]: 6420001848.309443
total sum [17768]: 6420001848.309442

これにより、CUDA 10.2で追加されたVirtual Memory Management機能により、GPUのデバイスメモリを複数のプロセスで共有できる事が確認できた。

駄菓子菓子。現状では Managed Device Memory に対応しておらず、できる事は既存のcuMemAlloccuIpcGetMemHandle と変わらない。ファイルディスクリプタの受け渡しなど、面倒な要素はあるので、今の時点で積極的に利用する必要性はない。

ただし、おそらく今後の CUDA Toolkit のバージョンアップの中で、どこかのタイミングで Managed Device Memory への対応が(ひっそりと)行われるであろう。その時になって、慌ててアプリケーションの大規模な改修を行わずに済むよう、頭の片隅に当該API群の事を留め置いてもよいだろう。

*1:厳密には必ずしも真ではないが、その場合の性能ペナルティが激しいので、PG-Stromでは選択肢とはしていない。

*2:ここで、『おぅ、マジか…。』となる

*3:なお、下記のエントリの仕組みは今では使っていませんが、PG-Stromの deadcode/ 以下に当時の残骸が残っています

Billion rows processed per second at a single-node PostgreSQL

I have worked on benchmarking of PG-Strom at a large hardware configuration for a couple of months.
Due to the server models we had, our benchmark results had been usually measured at a small 1U rack server with 1CPU, 1GPU and 3-4 NVME-SSDs, even though PG-Strom supports multi-GPUs and striping of NVME-SSDs.
So, we determined to arrange more powerful hardware environment for a validation of maximum performance of PG-Strom a few months before. After that, we could confirm billion-rows processed per second performance at a single-node PostgreSQL system using Star Schema Benchmark (SSBM), as we have expected.
This article introduces the technology briefs, benchmark results and expected applications.

Hardware configuration for the benchmark

The diagram below shows the hardware configuration we prepared for the benchmark project.

The 4U-rack server (Supermicro SYS-4029GP-TRT) is a certified model for NVIDIA Tesla V100 GPUs *1, and optimized for NVIDIA GPUDirect RDMA by PCIe-switch.
PCIe-switch has two purpose here. It enables to install more device than host system’s PCIe lanes *2, and also enables to bypass CPU on peer-to-peer data transfer between PCIe devices under the PCIe-switch.
It is an ideal configuration for us, because PG-Strom fully utilize the P2P data transfer on SSD-to-GPU Direct SQL mode, and it is the key of performance.
U.2 NVME-SSD drives (Intel DC P4510) are installed on the external JBOF enclosures, and connected to the host system using PCIe host cards and direct attach cables *3. This host card is designed to install on PCIe x16 slot, and capable to connect four NVME-SSD drives that support PCIe x4 bandwidth. So, data transfer bandwidth over the PCIe-bus shall balance on 1xGPU and 4xSSDs.
Below is the block diagram of our benchmark environment.


Element technology① - SSD-to-GPU Direct SQL

It is a characteristic feature of PG-Strom. By co-operation with a special Linux kernel driver (nvme_strom) that intermediates peer-to-peer DMA from NVME-SSD to GPU over PCIe-bus, PG-Strom can directly load PostgreSQL data blocks on NVME-SSD drives onto GPU’s device memory, but CPU/RAM is bypassed.

Usually, software cannot determine which items are necessary and which ones are junks, prior to data blocks are loaded to system RAM. On the other word, we consume I/O bandwidth and CPU cycles to copy junk data.
SSD-to-GPU Direct SQL changes the data flow. GPU pre-processes SQL workloads on the middle of I/O path to eliminate unnecessary rows and runs JOIN/GROUP BY steps. So, CPU/RAM eventually receives just a small portion of the result set from the GPU.

Element technology② - Arrow_Fdw

Apache Arrow is a column-oriented data format for structured data-set, and many applications (especially, big-data and data analytics area) support it for data exchange. PG-Strom supports to read Apache Arrow files as its columnar store, in addition to PostgreSQL’s row data blocks.

Due to the nature of data format, columnar-data enables to read only referenced columns, unlike row-data. It usually reduce amount of I/O to be read from the storage.
Arrow_Fdw is designed for direct read from Apache Arrow files without data importing to database system. It means we can eliminate one time-consuming steps, if conprehensive software generates imput data in Apache Arrow format. It is a suitable characteristic for IoT/M2M log processing system that usually generates tons of data to be loaded to data processing phase.

Star Schema Benchmark and PostgreSQL partition

As our usual, we used Star Schema Benchmark (SSBM) for performance measurement.
Its scaling factor of lineorder is SF=4000, then it shall be distributed to four partition-leafs using hash-partition of PostgreSQL.
So, individual partition-leafs has about 879GB (6 billion rows) row-data, and total size of lineorder is about 3.5TB.

We also set up equivalent Apache Arrow files for each partition leaf, and set up one another partition table that is consists of foreign-tables on Arrow_Fdw.

SSBM defines 13 queries that containes a scan on lineorder that is the largest portion and JOIN / GROUP BY. For example, the query below is Q2_3.

select sum(lo_revenue), d_year, p_brand1
  from lineorder, date1, part, supplier
  where lo_orderdate = d_datekey
    and lo_partkey = p_partkey
    and lo_suppkey = s_suppkey
     and p_brand1 = 'MFGR#2221'
     and s_region = 'EUROPE'
  group by d_year, p_brand1
  order by d_year, p_brand1;

Benchmark Results

Below is the benchmark result. The vertical axis means number of rows processed per second.
Its definition is (number of lineorder; 24billion rows) / (SQL response time).
For example, PG-Strom + Arrow_Fdw responds the result of Q1_2 within 14.0s, so it means 1.71 billion rows were processed per second.

The blue bar is PostgreSQL v11.5 with a manual tuning to launch 24 parallel workers *4. Its performance was about 50-60 million rows per second.

The orange bar is PG-Strom on row-data of PostgreSQL by SSD-to-GPU Direct SQL. Its performance was about 250 million rows per second.

These two series has little variation over the 13 queries, because i/o dominates the overall workloads rather than JOIN / GROUP BY, thus equivalent amount of storage i/o led almost equivalent performance.

The green bar is PG-Strom + Arrow_Fdw with SSD-to-GPU Direct SQL, is the topmost performance.
Due to the nature of columnar data, query performance was variable according to the number of referenced columns.
Regarding of the group of Q1_* and Q2_*, we could validate the performance more than billion rows processed per second.

The graph above is time-seriesed result of iostat.
It shows PG-Strom could load the data from 16x NVME-SSD drives in 40GB/s during the query execution.
Here are 13 mountains because SSBM defines 13 queries.

Conclusion

This benchmark results shows that a proper configuration of hardware and software can process reporting and analytics queries on terabytes grade data-set more than billion rows per second performance.
This grade of performance will change our assumption towards system architecture to process "big-data".
People have usually applied cluster system without any choice, however, accelerated PostgreSQL with GPU + NVME can be an alternative choice for them.

We think our primary target is log-data processing at IoT/M2M area where many devices generate data day-by-day. The raw data is usually huge for visualization or machine-learning, so needs to be summarized first prior to other valuable tasks.
A single node configuration makes system administration much simpler than cluster-based solution, and PostgreSQL is a long-standing software thus many engineers are already familiar with.

Appendix - hardware components.

This parts list is just for your reference

Parts Qty
model Supermicro SYS-4029GP-TRT 1
CPU Intel Xeon Gold 6226 (12C, 2.7GHz) 2
RAM 16GB DIMM (DDR4-2933; ECC) 12
GPU NVIDIA Tesla V100 (PCI-E; 16GB) 2
GPU NVIDIA Tesla V100 (PCI-E; 32GB) 2
HDD Seagate 2.5inch 1.0TB/2.0TB 4
JBOF SerialCables PCI-ENC8G-08A 2
SSD Intel DC P4510 (U.2; 1.0TB) 16
HBA SerialCables PCI-AD-x16HE-M 4

*1:This model is capable to install up to 8 GPUs

*2:Xeon Gold 6226 [Cascade Lake] has 48lanes

*3:Supermicro does not support to replace the internal storage backplane to the product that support NVME.

*4:10 workers were launched in the default, so it means 2-3 workers per partition were assigned. It is too small and cannot pull out i/o capability because CPU usage ratio was 100% during the execution.

秒速で10億レコードを処理する話

これまでのPG-Stromの性能測定といえば、自社保有機材の関係もあり、基本的には1Uラックサーバに1CPU、1GPU、3~4台のNVME-SSDを載せた構成のハードウェアが中心だった。*1
ただソフトウェア的にはマルチGPUやNVME-SSDのストライピングに対応しており、能力的にどこまで伸ばせるのかというのは気になるところである。
そこで、方々に手を尽くして、次のようなベンチマーク環境を整備してみた。
(機材をお貸し頂いたパートナー様には感謝感激雨あられである)

4UサーバのSYS-4029GP-TRTというモデルは、GPUをたくさん乗っけるためにPCIeスイッチを用いてPCIeスロットを分岐している。ちょうど、PCIeスイッチ1個あたり2個のPCIe x16スロットが用意されており、同じPCIeスイッチ配下のデバイス同士であれば、完全にCPUをバイパスしてPeer-to-Peerのデータ転送ができる。Supermicro自身も、このサーバを"GPUDirect RDMAに最適化"したモデルとして売っている。

こういう構造のサーバであるので、P2P DMAを用いてSSDからGPUへデータを転送する場合、PCIeスイッチの配下にある2本のPCIeスロットにそれぞれSSDGPUをペアにして装着すると、データ転送の時に効率が良い。

U.2のNVME-SSDを装着するには外部のエンクロージャが必要で、今回は(色々あって)SerialCables社のPCI-ENC8G-08Aという製品を使用した。これはエンクロージャあたり8本のU.2 NVME-SSDを装着する事ができ、ダイレクトアタッチケーブルを使用して各2枚のPCIeホストカード(PCI-AD-x16HE-M)と接続する。

そうすると、GPU 1台あたりU.2 NVME-SSDを4台のペアを構成する事ができ、それぞれPCIe Gen3.0 x16レーン幅の帯域でCPUをバイパスして直結できるようになる。
ブロックダイアグラムにして書き直すと以下の通り。


Star Schema Benchmarkとデータセット

性能評価に使ったのはいつもの Star Schema Benchmark(SSBM) で、SF=4000で作ったデータセットPostgreSQLのHashパーティショニング機能を使って4つのユニットにデータを分散させる。つまり、U.2 NVME-SSDを4台あたりSF=1000相当の規模のデータ(60億件、879GB)を持つことになる。

さらにデータの持ち方も、PostgreSQLの行形式に加えて、PG-Stromの列ストアであるApache Arrow形式で全く同じ内容のファイルを用意して、各パーティションへ配置した。

Apache Arrow形式というのは構造化データを列形式で保存・交換するためのフォーマットで、PG-StromにおいてはArrow_Fdw機能を用いての直接読み出し(SSD-to-GPU Direct SQLを含む)に対応している。詳しくはこちらのエントリーなど。

kaigai.hatenablog.com

SSBMには全部で13種類のクエリが含まれており、例えば、Q2_3のクエリは以下の通り。
データ量の多いlineorderのスキャンと同時に、他のテーブルとのJOINやGROUP BYを含むワークロードである。

select sum(lo_revenue), d_year, p_brand1
  from lineorder, date1, part, supplier
  where lo_orderdate = d_datekey
    and lo_partkey = p_partkey
    and lo_suppkey = s_suppkey
     and p_brand1 = 'MFGR#2221'
     and s_region = 'EUROPE'
  group by d_year, p_brand1
  order by d_year, p_brand1;

ベンチマーク結果

という訳で、早速ベンチマーク結果を以下に。
縦軸は単位時間あたりの処理行数で、(lineorderの行数;240億行)÷(SQL応答時間)で計算している。例えば PG-Strom 2.2 + Arrow_Fdw における Q1_2 の応答時間は 14.0s なので、毎秒17.1億行を処理しているということになる。

青軸は PostgreSQL v11.5 で、並列クエリ数を24に引き上げるというチューニング*2を行っている。性能値としては、毎秒50~60百万行の水準。

オレンジの軸は、PostgreSQLの行データに対して PG-Strom v2.2 のSSD-to-GPU Direct SQLを使用してクエリを実行したもの。性能値としては、毎秒250百万行前後の水準。

この二つに関しては、13個のクエリの間で性能値に大きな傾向の差がない。これは、JOIN/GROUP BYの処理負荷よりも、まずI/Oの負荷が支配項になっており、行データである限りは参照されていない列も含めてストレージから読み出さねばならないためだと考えられる。

緑の軸が真打で、PG-Strom v2.2のSSD-to-GPU Direct SQLをArrow_Fdw管理下の列ストアに対して実行したもの。
これは列データなので、参照するカラムの数によって大きく性能値の傾向が違っている様子が見えるが、Q1_*のグループ、Q2_*のグループに関しては、目標としていた毎秒10億行の処理能力を実証できたことになる。

一応、4xGPU + 16xNVME-SSD できちんとI/Oの性能が出ているという事を確認するために、クエリ実行中の iostat の結果を積み上げグラフにしてみた。山が13個あるのはクエリを13回実行したという事で、物理的には概ね40GB/sのSeqRead性能が出ている事がわかる。(つまり、クエリ応答性能の違いは参照している列の数による、という事でもある)

参考までに、今回の構成は以下の通り。

型番 数量
model Supermicro SYS-4029GP-TRT 1
CPU Intel Xeon Gold 6226 (12C, 2.7GHz) 2
RAM 16GB (DDR4-2933; ECC) 12
GPU NVIDIA Tesla V100 (PCI-E; 16GB) 2
GPU NVIDIA Tesla V100 (PCI-E; 32GB) 2
HDD Seagate 2.5inch 1.0TB/2.0TB 4
JBOF SerialCables PCI-ENC8G-08A 2
SSD Intel DC P4510 (U.2; 1.0TB) 16
HBA SerialCables PCI-AD-x16HE-M 4

ご自分でも環境を作ってみたいという方はご参考に。

PostgreSQL Conference Japan 2019

今回の一連の検証結果に関しては、来る11月15日(金)に品川駅前(AP品川)で開催予定の PostgreSQL Conference Japan 2019 にて『PostgreSQLだってビッグデータ処理したい!! ~GPUとNVMEを駆使して毎秒10億レコードを処理する技術~』と題して発表を行います。
有償でのカンファレンスではありますが、私の発表の他にも、経験豊富なPostgreSQLエンジニアによる14のセッション/チュートリアルが予定されており、ぜひご参加いただければと思います。

www.postgresql.jp

*1:例外としては、PGconf.ASIA 2018などに向けて、NEC様の協力でExpEtherを3台、3xGPU + 6xSSDの構成を作って13.5GB/sを記録したもの。

*2:デフォルトだとnworkers=10程度、すなわちパーティションあたり2~3のワーカーとなり、CPU100%で貼り付いてしまうため

Asymmetric Partition-wise JOIN

久々に PostgreSQL 本体機能へのパッチを投げたので、それの解説をしてみる。

PostgreSQL: Re: Asymmetric partition-wise JOIN

背景:Partition-wise JOIN

PostgreSQLパーティションを使ったときに、全く同一のパーティションの切り方をして、かつパーティションキーをJOINの結合条件に用いた場合に限り、パーティション子テーブル同士のJOINを先に行い、その結果を出力するという機能がある。

以下の例では、ptableおよびstableは、それぞれ列distの値を用いたHashパーティションを設定しており、3つずつの子テーブルを持つ。

postgres=# \d
                List of relations
 Schema |   Name    |       Type        | Owner
--------+-----------+-------------------+--------
 public | ptable    | partitioned table | kaigai
 public | ptable_p0 | table             | kaigai
 public | ptable_p1 | table             | kaigai
 public | ptable_p2 | table             | kaigai
 public | stable    | partitioned table | kaigai
 public | stable_p0 | table             | kaigai
 public | stable_p1 | table             | kaigai
 public | stable_p2 | table             | kaigai
(8 rows)

これをJOINする時の実行計画は以下の通り。

postgres=# explain select * from ptable p, stable s where p.dist = s.dist;
                                     QUERY PLAN
------------------------------------------------------------------------------------
 Hash Join  (cost=360.00..24617.00 rows=10000 width=49)
   Hash Cond: (p.dist = s.dist)
   ->  Append  (cost=0.00..20407.00 rows=1000000 width=12)
         ->  Seq Scan on ptable_p0 p  (cost=0.00..5134.63 rows=333263 width=12)
         ->  Seq Scan on ptable_p1 p_1  (cost=0.00..5137.97 rows=333497 width=12)
         ->  Seq Scan on ptable_p2 p_2  (cost=0.00..5134.40 rows=333240 width=12)
   ->  Hash  (cost=235.00..235.00 rows=10000 width=37)
         ->  Append  (cost=0.00..235.00 rows=10000 width=37)
               ->  Seq Scan on stable_p0 s  (cost=0.00..60.77 rows=3277 width=37)
               ->  Seq Scan on stable_p1 s_1  (cost=0.00..62.69 rows=3369 width=37)
               ->  Seq Scan on stable_p2 s_2  (cost=0.00..61.54 rows=3354 width=37)
(11 rows)

おっとっと。
この場合、ptableパーティションの子テーブル3つと、stableパーティションの子テーブル3つをそれぞれ全て読み出し、メモリ上で結合した結果同士をHash Joinで結合する事がわかる。

Partition-wise JOINはデフォルトでは off になっているので、enable_partitionwise_joinパラメータをonにセットして明示的に有効化する必要がある。

postgres=# set enable_partitionwise_join = on;
SET
postgres=# explain select * from ptable p, stable s where p.dist = s.dist;
                                     QUERY PLAN
------------------------------------------------------------------------------------
 Append  (cost=101.73..19617.00 rows=10000 width=49)
   ->  Hash Join  (cost=101.73..6518.87 rows=3277 width=49)
         Hash Cond: (p.dist = s.dist)
         ->  Seq Scan on ptable_p0 p  (cost=0.00..5134.63 rows=333263 width=12)
         ->  Hash  (cost=60.77..60.77 rows=3277 width=37)
               ->  Seq Scan on stable_p0 s  (cost=0.00..60.77 rows=3277 width=37)
   ->  Hash Join  (cost=104.80..6527.08 rows=3369 width=49)
         Hash Cond: (p_1.dist = s_1.dist)
         ->  Seq Scan on ptable_p1 p_1  (cost=0.00..5137.97 rows=333497 width=12)
         ->  Hash  (cost=62.69..62.69 rows=3369 width=37)
               ->  Seq Scan on stable_p1 s_1  (cost=0.00..62.69 rows=3369 width=37)
   ->  Hash Join  (cost=103.47..6521.06 rows=3354 width=49)
         Hash Cond: (p_2.dist = s_2.dist)
         ->  Seq Scan on ptable_p2 p_2  (cost=0.00..5134.40 rows=333240 width=12)
         ->  Hash  (cost=61.54..61.54 rows=3354 width=37)
               ->  Seq Scan on stable_p2 s_2  (cost=0.00..61.54 rows=3354 width=37)
(16 rows)

同じクエリに対して、set enable_partitionwise_join = onを設定した状態で実行計画を作らせると、対応するパーティションの子テーブル同士でJOINを行い、その次にAppend、つまり各パーティション子要素の処理結果を結合している事が分かる。

これはJOINの問題サイズを小さくし、多くの場合、Append処理に要するCPUサイクルを減らすことのできる優れた最適化テクニックではあるが、かなりの慎重さを以ってDB設計を行う必要がある。
なぜなら『全く同一のパーティションの切り方をして、かつパーティションキーをJOINの結合条件に用いる』事ができるよう、パーティション設計とSQLクエリの書き方を考える必要があるからである。

新機能:Asymmetric Partition-wise JOIN

同じようなノリで、非パーティションテーブルとパーティションテーブルの間のJOIN処理を、Appendの前に移動する事ができる。
例えば、非パーティションテーブルであるt1ptableとの間のJOINを (t1 \times ptable)と記述すると、これは (t1 \times ptable_p0) + (t1 \times ptable_p1) + (t1 \times ptable_p2)と展開する事ができる。

言い換えれば、t1を各パーティション子テーブルに分配する(クエリの書き換えに相当)事で、Appendよりも先にJOINを実行する事ができる。
もちろん、メリット・デメリットはあるので、先にパーティション子テーブルの内容を全て読み出した後でJOINを実行した方が良いというケースもある。

具体的に Asymmetric Partition-wise JOIN が活きてくるケースというのは

  • パーティション側のテーブルが、読み出しコストを無視できる程度に小さい。
    • 分配された分、複数回の読み出しが必要となってしまうため。
  • 子テーブルとのJOINにより、かなりの比率で行数が減ることが見込まれる。
    • 行数が減らなければ、Append処理は楽にならない。

というケースなので、あらゆる場合で効果があるかというと、そのような銀の弾丸はない。

では試してみることにする。
本来、以下のような実行計画となったいたクエリであるが・・・

postgres=# explain select * from ptable p, t1 where p.a = t1.aid;
                                    QUERY PLAN
----------------------------------------------------------------------------------
 Hash Join  (cost=2.12..24658.62 rows=49950 width=49)
   Hash Cond: (p.a = t1.aid)
   ->  Append  (cost=0.00..20407.00 rows=1000000 width=12)
         ->  Seq Scan on ptable_p0 p  (cost=0.00..5134.63 rows=333263 width=12)
         ->  Seq Scan on ptable_p1 p_1  (cost=0.00..5137.97 rows=333497 width=12)
         ->  Seq Scan on ptable_p2 p_2  (cost=0.00..5134.40 rows=333240 width=12)
   ->  Hash  (cost=1.50..1.50 rows=50 width=37)
         ->  Seq Scan on t1  (cost=0.00..1.50 rows=50 width=37)
(8 rows)

同様に enable_partitionwise_join パラメータによって当該機能は有効化され、以下のような『賢い』実行計画を生成するようになる。

postgres=# explain select * from ptable p, t1 where p.a = t1.aid;
                                    QUERY PLAN
----------------------------------------------------------------------------------
 Append  (cost=2.12..19912.62 rows=49950 width=49)
   ->  Hash Join  (cost=2.12..6552.96 rows=16647 width=49)
         Hash Cond: (p.a = t1.aid)
         ->  Seq Scan on ptable_p0 p  (cost=0.00..5134.63 rows=333263 width=12)
         ->  Hash  (cost=1.50..1.50 rows=50 width=37)
               ->  Seq Scan on t1  (cost=0.00..1.50 rows=50 width=37)
   ->  Hash Join  (cost=2.12..6557.29 rows=16658 width=49)
         Hash Cond: (p_1.a = t1.aid)
         ->  Seq Scan on ptable_p1 p_1  (cost=0.00..5137.97 rows=333497 width=12)
         ->  Hash  (cost=1.50..1.50 rows=50 width=37)
               ->  Seq Scan on t1  (cost=0.00..1.50 rows=50 width=37)
   ->  Hash Join  (cost=2.12..6552.62 rows=16645 width=49)
         Hash Cond: (p_2.a = t1.aid)
         ->  Seq Scan on ptable_p2 p_2  (cost=0.00..5134.40 rows=333240 width=12)
         ->  Hash  (cost=1.50..1.50 rows=50 width=37)
               ->  Seq Scan on t1  (cost=0.00..1.50 rows=50 width=37)
(16 rows)

t1テーブルが各パーティション子テーブル毎に読み出され、その結果を Append によって結合している事がお分かりだろうか。
しかも、最初のケースでは Append は 100万行を処理しなければならないところ、後者ではHash Joinによって大幅に行数が削られているため、たった49950行(推定値)しか処理しない事になっている。これに伴う推定コストの低下によって、Asymmetric Partition-wise JOINを使った実行計画が選択された。

ちなみに、結合すべきテーブルを増やしても、(コスト的に見合えば)各パーティション子テーブルへと分配してくれる。

postgres=# explain select * from ptable p, t1, t2 where p.a = t1.aid and p.b = t2.bid;
                                       QUERY PLAN
----------------------------------------------------------------------------------------
 Append  (cost=4.25..19893.99 rows=2495 width=86)
   ->  Hash Join  (cost=4.25..6625.83 rows=832 width=86)
         Hash Cond: (p.b = t2.bid)
         ->  Hash Join  (cost=2.12..6552.96 rows=16647 width=49)
               Hash Cond: (p.a = t1.aid)
               ->  Seq Scan on ptable_p0 p  (cost=0.00..5134.63 rows=333263 width=12)
               ->  Hash  (cost=1.50..1.50 rows=50 width=37)
                     ->  Seq Scan on t1  (cost=0.00..1.50 rows=50 width=37)
         ->  Hash  (cost=1.50..1.50 rows=50 width=37)
               ->  Seq Scan on t2  (cost=0.00..1.50 rows=50 width=37)
   ->  Hash Join  (cost=4.25..6630.20 rows=832 width=86)
         Hash Cond: (p_1.b = t2.bid)
         ->  Hash Join  (cost=2.12..6557.29 rows=16658 width=49)
               Hash Cond: (p_1.a = t1.aid)
               ->  Seq Scan on ptable_p1 p_1  (cost=0.00..5137.97 rows=333497 width=12)
               ->  Hash  (cost=1.50..1.50 rows=50 width=37)
                     ->  Seq Scan on t1  (cost=0.00..1.50 rows=50 width=37)
         ->  Hash  (cost=1.50..1.50 rows=50 width=37)
               ->  Seq Scan on t2  (cost=0.00..1.50 rows=50 width=37)
   ->  Hash Join  (cost=4.25..6625.48 rows=831 width=86)
         Hash Cond: (p_2.b = t2.bid)
         ->  Hash Join  (cost=2.12..6552.62 rows=16645 width=49)
               Hash Cond: (p_2.a = t1.aid)
               ->  Seq Scan on ptable_p2 p_2  (cost=0.00..5134.40 rows=333240 width=12)
               ->  Hash  (cost=1.50..1.50 rows=50 width=37)
                     ->  Seq Scan on t1  (cost=0.00..1.50 rows=50 width=37)
         ->  Hash  (cost=1.50..1.50 rows=50 width=37)
               ->  Seq Scan on t2  (cost=0.00..1.50 rows=50 width=37)
(28 rows)

PG-Stromとの関連

この機能は、もちろんピュアなPostgreSQLで大量データを扱うときに効果を発揮するものである。

ただそれ以上に、PG-Stromのように『データが物理的にどこに存在するのか』を気にするソリューションだと更に大きな恩恵がある。

例えば、日々大量に溜まっていくログデータを、パーティション分割によって複数のディスクに物理的に分割格納し、集計・解析時にはこれを他のテーブルとJOIN/GROUP BYするという、比較的ありがちな処理を考えてみる。

もし非パーティションテーブルとパーティションテーブルのJOINが必ずAppendの後であれば、SSD-to-GPU Direct SQLを使ったとしても、CPUが処理すべき行数はほとんど減ることはない*1ため、その後のJOIN/GROUP BY処理でGPUを使えたとしても、データの流れは Disk → CPU/RAM → GPU → CPU/RAM となってしまうため、データのピンポンによって転送効率はかなり悪化してしまう。

Asymmetric Partition-wise JOINによって、非パーティションテーブルとパーティション子テーブルのJOINを先に実行できるようになれば、これはSSD-to-GPU Direct SQLがフル稼働できる状況になり、データの流れも Disk → GPU → CPU/RAM とかなりシンプルになる。

これはとりわけ、以下のような構成のマシンを用いてPCIeスイッチ経由でSSDGPU間でのダイレクトデータ転送を行う場合に顕著で、SQLワークロードの大半をPCIeスイッチより外側のNVME-SSDGPUのペアで実行する事ができるので、データが全くCPUを経由することなく処理されてしまう(= シングルノードでもPCIeバスの限界までスケールできる)という事になってしまう。

こういった諸々面白い事ができるようになるので、ぜひ皆さんにもCommitFestに登録されたパッチのレビューに参加していただければ幸いである。

*1:スキャン条件のみで大半の行を落とせるという幸運な場合を除く

技術負債を返した話(Pre-built GPU Binary対応)

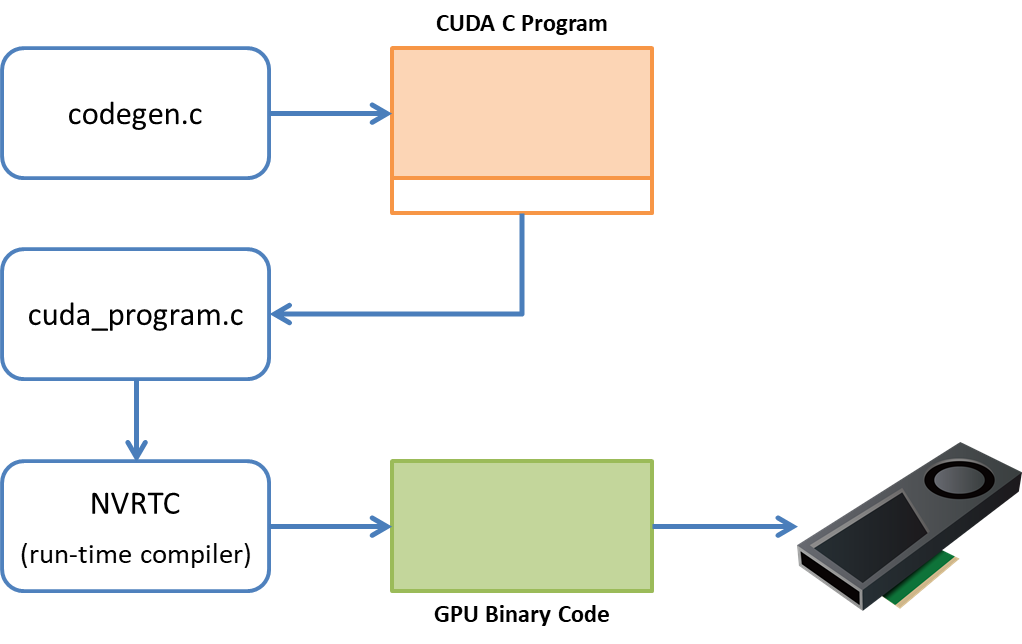
最もプリミティブなPG-Stromの処理は、ユーザが入力したSQLを元にCUDA CのGPUプログラムを自動生成し、これを実行時コンパイル。ここで生成されたGPUバイナリを用いて、ストレージから読み出したデータをGPUで並列処理するという一連の流れである。
後にJOIN/GROUP BYの対応や、データ型の追加、SSD-to-GPU Direct SQLなど様々な機能を付加したものの、このコード生成と実行時ビルドの仕組みは2012年に最初のプロトタイプを公開した時から大きく変わってはいない。

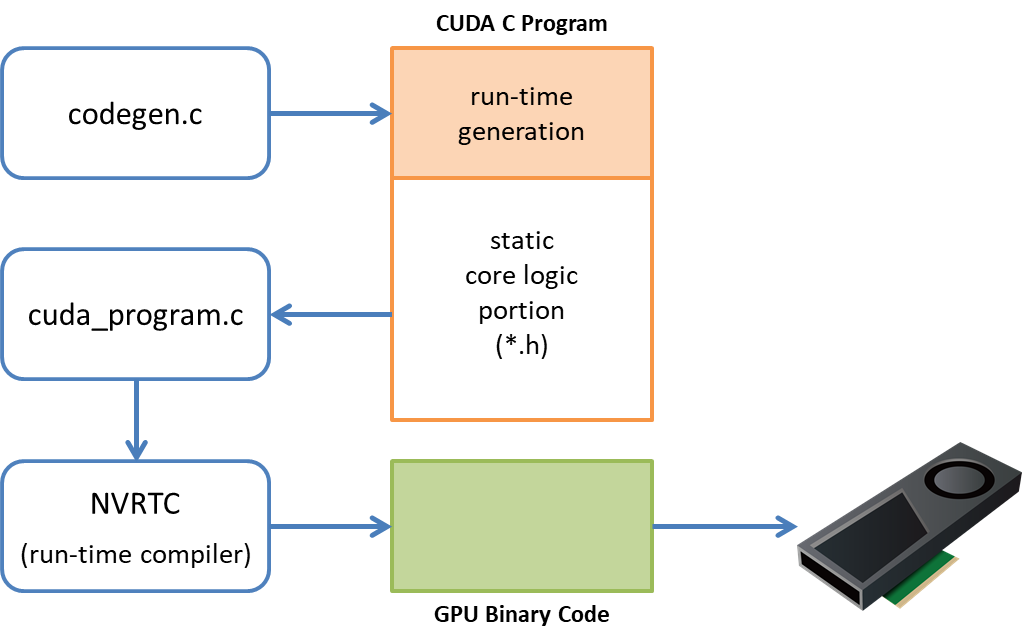
コードの自動生成を担当するのはcodegen.cで、この人が吐いたCUDA Cプログラムをcuda_program.cがNVRTC (NVIDIA Run-Time Compiler) を使ってコンパイルし、GPUバイナリを生成する。

ただ、当初の『全件スキャンWHERE句・固定長データ型のみ』というシンプルなコード生成が、やがてJOIN/GROUP BYや、numeric型やtext型の対応など、より複雑な処理をGPUで実行するようになるにつれて、自動生成部分だけでなく、静的に書いておいた部分と組み合わせてGPUプログラムを生成するようになる。
これは当然で、例えばGPUでHash-Joinを実行する場合でも、クエリを処理するたびに変わる可能性があるのは、二つのテーブルを結合するJoin-Keyの結合条件を評価する部分だけで、Hash-Joinの基本的なアルゴリズムは同じだからである。

これらの静的なCUDA Cコードは、ヘッダファイル(*.h)として記述され、cuda_program.cでコードをコンパイルする時にインクルードする事で、動的生成したコードと組み合わせて使用していた。

ただし…。
PG-Stromの機能が増え、静的なCUDA Cコードの割合が増えるにつれ実行時コンパイルの時間は徐々に増えていく事になる。
intやtextといった基本的なデータ型の比較といった、シンプルなコードであれば気になる程ではないが、例えば、(コーナーケースではあるが)複合型(Composite Type)のデータをGPU側で生成する場合などは、対応する全てのデータ型が関わってくるため、ビルドに要する時間がSQLの実行時間よりも遥かに長くなるという本末転倒な状況が起こる。
その場合、一度ビルドしたGPUバイナリは共有メモリ上にキャッシュされるため、初回と2回目以降のSQL実行時間が大幅に異なるという事になってしまう。

そこで、ほぼ一週間を丸々要してGPUコードの実行時コンパイルに係る部分のリファクタリングを行った。
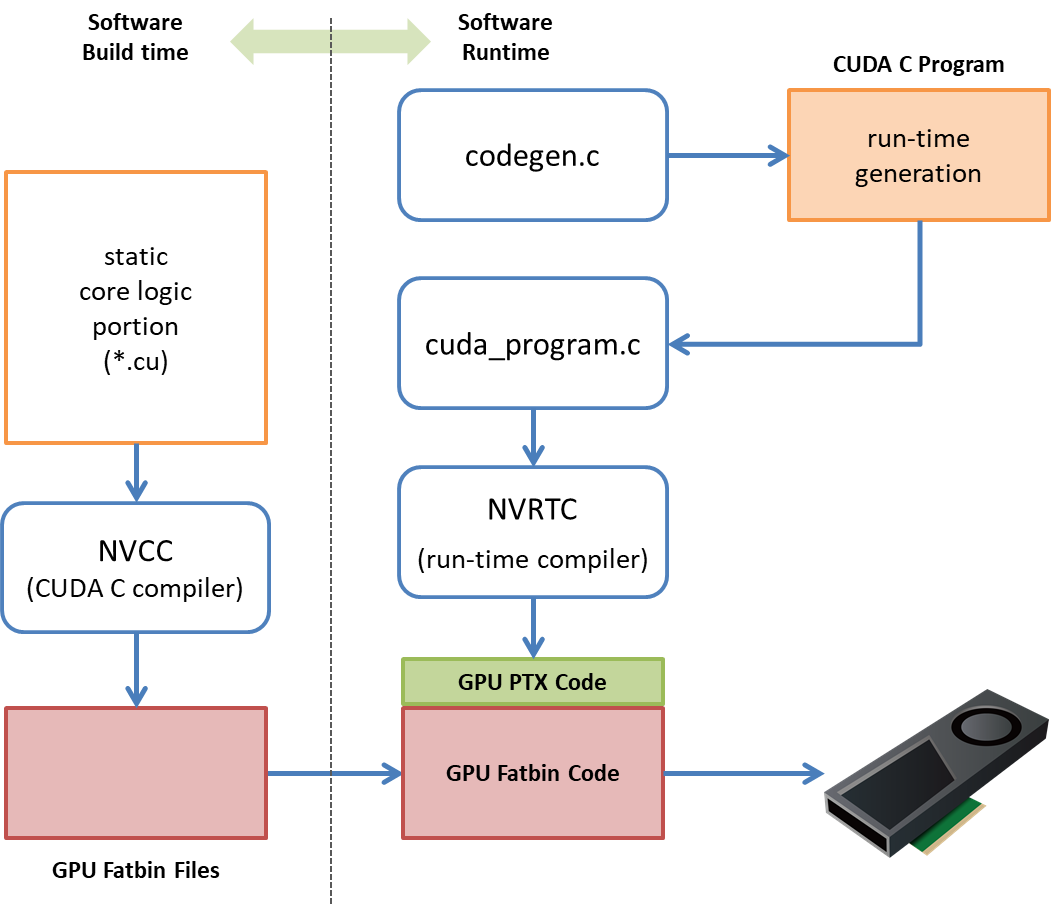
要は、静的なCUDA Cコードは予めコンパイルして、実行時にはバイナリをリンクすれば済む話なので、ある程度以上に複雑な構造を持つ関数は cuda_gpujoin.cucuda_numeric.cuという形で切り出し、PG-Strom自体のビルド時に、NVCCを用いてGPUバイナリファイルを生成するようにした。
これらは動的に生成されたコードと実行時リンクされ、最終的にはこれまでと同じ処理を行うようになる。
静的な部分は Fatbin 形式という形でインストールされる。この形式は、GPUの各世代(Pascal, Volta, Turing)向けに最適化されたバイナリを内部にアーカイブし、ターゲットGPUに最も適したバイナリをリンク時に使用してくれる。

なので、インストールされたPG-Strom関連ファイルを見てみると、目新しいファイルが並んでいる…という事になる。(*.gfatbin ファイルはデバッグオプションを有効にしてビルドしたバージョン。pg_strom.debug_jit_compile_options=onの時にはこちらが利用される)

[kaigai@magro ~]$ ls /usr/pgsql-11/share/pg_strom
arrow_defs.h          cuda_gpupreagg.fatbin   cuda_gpusort.h        cuda_numeric.gfatbin    cuda_textlib.gfatbin
cuda_basetype.h       cuda_gpupreagg.gfatbin  cuda_jsonlib.fatbin   cuda_numeric.h          cuda_textlib.h
cuda_common.fatbin    cuda_gpupreagg.h        cuda_jsonlib.gfatbin  cuda_plcuda.h           cuda_timelib.fatbin
cuda_common.gfatbin   cuda_gpuscan.fatbin     cuda_jsonlib.h        cuda_primitive.fatbin   cuda_timelib.gfatbin
cuda_common.h         cuda_gpuscan.gfatbin    cuda_misclib.fatbin   cuda_primitive.gfatbin  cuda_timelib.h
cuda_gpujoin.fatbin   cuda_gpuscan.h          cuda_misclib.gfatbin  cuda_primitive.h        cuda_utils.h
cuda_gpujoin.gfatbin  cuda_gpusort.fatbin     cuda_misclib.h        cuda_rangetype.h        pg_strom--2.2.sql
cuda_gpujoin.h        cuda_gpusort.gfatbin    cuda_numeric.fatbin   cuda_textlib.fatbin

ベンチマーク

GPUコードのビルドに要する時間を計測するため、何種類かのテスト用クエリを作成し、その実行時間を計測してみた。
とりあえずクエリは以下の7種類で計測してみた。

-- Q1 ... シンプルなGpuScan + Int型の演算
SELECT id, aid+bid FROM t0 WHERE aid < 100 AND bid < 100;

-- Q2 ... Numeric型を利用するGpuScan
SELECT id, a+b, a-c FROM t_numeric1 WHERE a < 50.0 AND b < 50.0;

-- Q3 ... Timestamp型とEXTRACT()文を使用するGpuScan
SELECT id, a, b FROM t_timestamp1 WHERE EXTRACT(day FROM a) = 19 and EXTRACT(month FROM b) = 6;

-- Q4 ... Arrow_Fdw外部テーブルからシンプルなデータ(Int, Timestamp)の読み出し
SELECT id,ymd FROM t_arrow WHERE id % 100 = 23;

-- Q5 ... Arrow_Fdw外部テーブルから複合型(Composite)の読み出し
SELECT id,v FROM t_arrow WHERE id % 100 = 23;

-- Q6 ... GpuJoinを含むクエリ
SELECT id, aid, atext FROM t0 NATURAL JOIN t1 WHERE bid < 50 AND cid < 50;

-- Q7 ... GpuPreAgg + GpuJoinを含むクエリ
SELECT cat, count(*), sum(ax) FROM t0 NATURAL JOIN t1 GROUP BY cat;

ディスクからの読み出しの影響を排除するため、関連する全てのテーブルをpg_prewarmでオンメモリ状態にした上で、上記の7つのクエリをそれぞれ2回ずつ実行した。
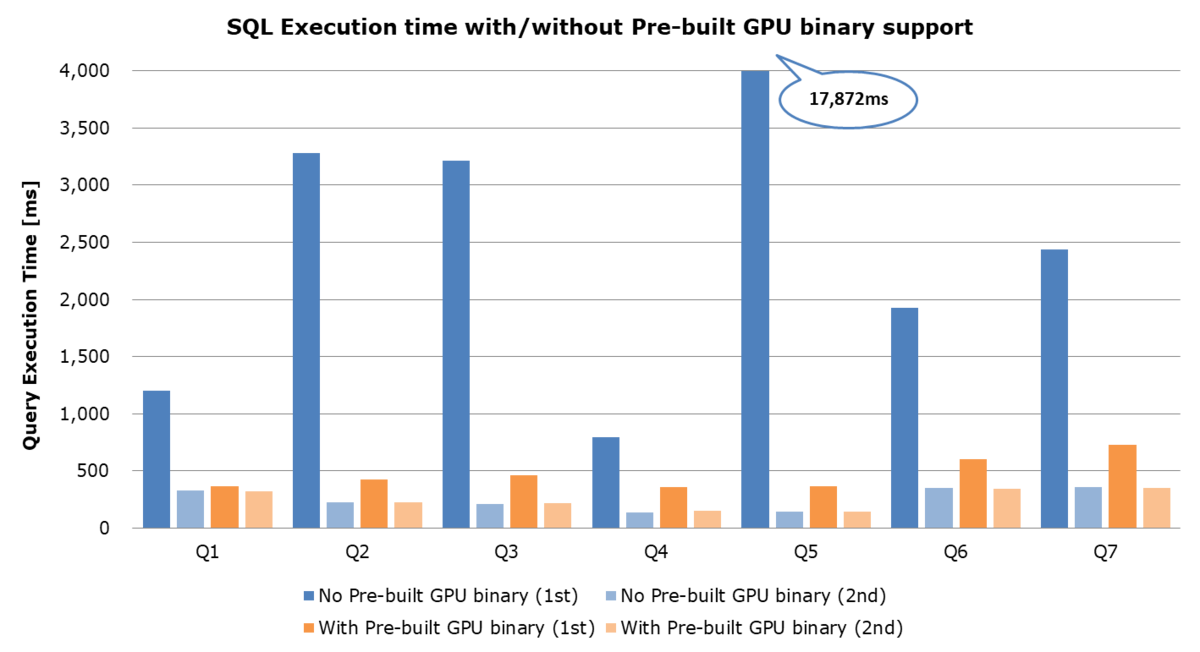
以下の表/グラフはその結果であるが、静的なCUDA Cコードを事前にビルドしておく事で、初回の実行時間が大幅に改善しているのが分かる。もちろん、最終的なGPUバイナリはほぼ同じ形になるので、ビルド済みGPUバイナリのキャッシュを参照できる2回目以降では処理時間の大きな差はない。(単位は全てms)
ちなみにQ5はめちゃめちゃ時間がかかっている。これは、Arrow形式(列データ)から複合型のデータをGPU上で再構成し、CPUへは行データとして返すという、非常にコード量の多い処理を行っているためである。

旧方式(1回目) 旧方式(2回目) 新方式(1回目) 新方式(2回目)
Q1 1,199.6 331.7 369.0 321.5
Q2 3,279.2 222.0 421.6 227.5
Q3 3,213.5 206.5 462.6 219.2
Q4 793.7 134.0 355.1 147.4
Q5 17,872.2 141.4 364.7 144.8
Q6 1,928.5 352.3 605.3 345.9
Q7 2,435.6 359.2 729.1 349.1

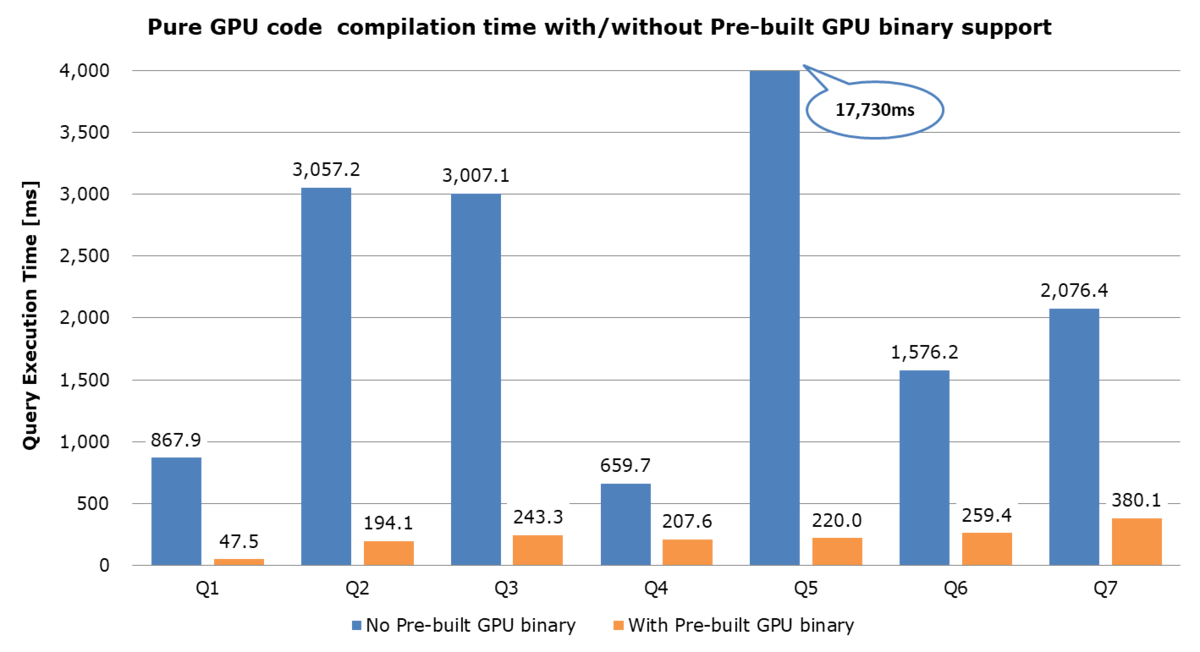
分かりやすいように、Pre-built GPU Binary機能の有無別に(2回目の実行時間)-(1回目の実行時間)を計算してみる。2回目は共有メモリ上のキャッシュを参照するだけなので、これが正味のビルド時間という事になるが、これまでは『一呼吸おいて』という感じだった部分がコンマ何秒程度にまで短くなった事が分かる。

背景

実はこの機能、別の要件を考えた時にどうしても急いで作らざるを得ない事情があった。
これまでユーザさんからの新機能の要求を優先して実装していたために、テストケースの作成やテスト自動化が後回しになってきた経緯があったのだが、エンタープライズ向けにはこれらソフトウェア品質改善/品質保証のためのプロセスは必要不可欠であり、今年の後半は少し腰を落ち着けてテストの充実を図ろうと考えている。
ただ、大量のテストを流すとなると、相応のバリエーションのSQLを実行する事となり、その度にGPUコードの自動生成と実行時コンパイルが走るのでは、テストケースの実行に非常に長い時間を要してしまう事になる。これではPG-Stromのテストをしているのか、コンパイラを動かしているのか分からない!